Note
You are viewing the documentation for an older release of Interworx (6.x). To see documentation for the current generally available release of Interworx, click here: 7.13.
NodeWorx Email Guide
Preface
This is the NodeWorx Email Guide, intended to provide server administrators with an overview of the electronic mail transfer and storage features of NodeWorx. In addition to providing a primer to electronic mail in general, this guide will also provide information on and assistance with configuring mail services, as well as troubleshooting and repairing common problems.
To be able to use this guide most effectively, you will need to know the following:
How to log into a NodeWorx Account on your server
How to log into your server via SSH
Basic Linux skills (entering commands, passing parameters)
An understanding of how permissions work in Linux
How to edit text files in a commandline editor, such as vi, vim, emacs, or nano
Structure of Email Services
Electronic mail is a very well-named messaging system. In many ways, it resembles the traditional postal mail services which it has largely replaced in everyday communication.In general, an individual email message is comprised of three parts: An “envelope”, a “header”, and a “message.” The envelope communicates delivery parameters. The headers include information on, at bare minimum, sender, recipient, subject, sending time stamp, and receiving time stamps of all mail servers on the path to the end user. Lastly, the mail message contains the actual information to be communicated, including any attached encoded files.
Basic Infrastructure
There are three protocols typically used in any standard email system: Simple Mail Transfer Protocol (SMTP) is used to send messages, and Post Office Protocol version 3 (POP3) or Internet Message Access Protocol version 4 (IMAP4) is used to receive messages.
The basic structure of an email transaction looks like this: Sender User Agent > Mail Transfer Agent(s) > Mail Delivery Agent > Recipient User Agent
Mail Transfer Agent
A Mail Transfer Agent is a piece of software that acts as a relay for email. It receives mail messages from a user’s mail client or another MTA, then stores it temporarily while attempting to pass it to either another MTA or an MDA. In the analogy of physical mail, an MTA is like a large post office, a temporary warehousing place for mail that has yet to reach its destination.
Mail Delivery Agent
Mail Delivery Agents are, to use the physical-mail analogy again, like a regional post office. They are the end point of a mail message’s journey across a network. Mail stays with the MDA until a user retrieves the mail through their client software.
Unsolicited Bulk Message Prevention
The comparisons between physical mail and email are never more apt than they are here. Both systems are practically clogged with junk - Advertisements, unsolicited requests for money, meaningless scrambled messages sent in some other strange attempt at getting rich quickly. An unsolicited bulk message filter is typically installed on the last leg of an email’s journey - Right between the MDA and the user. Of course, none of these systems are perfect, and as such numerous methods for training filters have come about.
Virus Control
Viruses, worms, trojan horses and other such malware are always loose in email messages, often going hand-in-hand with the junk mail problem. Virus filters sit next to UBM filters and try to analyze message attachments to determine if they contain any form of harmful software and if so, to clean it out or delete the mail entirely before harm can be done.
How InterWorx Implements Email
The Mail Transfer Agent
InterWorx uses Daniel J. Bernstein’s 1 qmail 2 as its MTA. qmail is intended to combat the largest weaknesses of the default sendmail MTA included with most Linux distributions, namely low security, speed, and reliability. qmail’s MTA consists of two primary segments: qmail-smtp, which manages the actual transfer of mail to and from the server, and qmail-send, which manages the queue. Also worth mentioning are the support components, qmail-queue (which manages the queue itself), qmail-inject (which is responsible for actually inserting messages into the queue directly), and the processes that are called by qmail-send to do the actual transferring, qmail-rspawn/qmail-lspawn and qmail-remote/qmail-local.
Mail Delivery Agents
qmail also forms one of the MDAs used by InterWorx, namely its POP3 delivery capabilities under the service name “qmail-pop3d”. IMAP4 delivery is provided by the Courier IMAP server 3, an IMAP4 MDA known for its ability to deliver a large quantity of mail simultaneously.
Quick Start
Quickly getting up and running with InterWorx’s email server is very easy to do - It eimply entails visiting the service configuration pages of each major service, turning it on, and then “checking in” at the queue to make sure everything’s up and running. If you want to do so, each service can also be set to run at system boot.
Setting up qmail MTA
Go to NodeWorx’s System Services > Mail Server > MTA menu.
Make sure that everything is green and running.
Set your maximum message size in the ’MTA SMTP Options (inbound)’ box. 6
Optionally, set the services to run at boot.
Setting up qmail-pop3d and courier-imap MDAs
Go to NodeWorx’s System Services > Mail Server > MDA menu.
Ensure that all four Server Control status boxes are showing green and running.
Optionally, set the services to run at boot.
Save your changes.
Spam Filtering
Go to NodeWorx’s System Services > Mail Server > Spam Filtering section.
Make sure that SpamAssassin is running.
In the SpamAssassin Options area, set SMTP-Level Scanning to Enabled. 7
Spam Score Threshold to 5. 8
Reporting Method should be “Attach Original.”
In Bayesian Scanning, enable everything except Global Bayesian Scanning.
Set the IMAP Learning Limit to 50. 9
Virus Filtering
Go to NodeWorx’s System Services > Mail Server > Virus Filtering section.
Make sure that both ClamAV (the virus filter itself) and Freshclam (the filter’s known-signature list updater) are Running.
Optionally, sset both to start on boot.
Optionally set ClamAV to automatically restart if it fails.
Optionally, enable SMTP-Level Virus Scanning. 10
Final Check
Go to NodeWorx’s System Services > Mail Server > Mail Queue section.
Make sure that the Local, Remote, and Todo queues are clear.
Configuring Mail Transfer Agent
The NodeWorx Mail Transfer Agent Configuration Page
SMTP Server Status Toggles
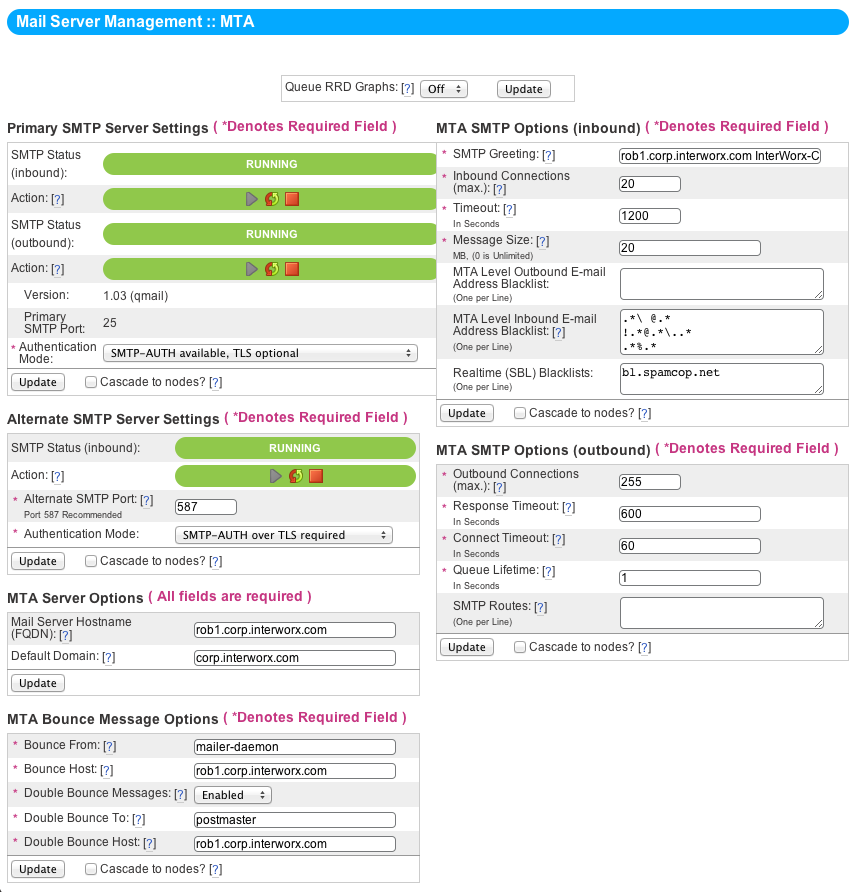
The Primary SMTP Server Settings box displays the service status and activity toggles for qmail-smtp (incoming) and qmail-send (outgoing). It also details the current qmail version and the primary port that SMTP operates over, which should always be 25. The Authentication Mode allows you to change between several modes, each of which uses either SMTP-AUTH, TLS, or both.
SMTP-AUTH is the standard SMTP authentication mode, requiring a username (the mailbox ID, user@domain.tld) and a password. SMTP-AUTH can be made optional, but must not be required over port 25 or your server would be unable to receive mail from other MTAs.
TLS, Transport Layer Security, is a cryptographic protocol that ensures secure communications. TLS requires an SSL certificate on the domain being logged into. The SSL certificate doesn’t need to be signed by a CA, but end-users will likely receive a security alert when the domain of the server being connected to and the cryptographic certificate don’t match or are not verifiable through a CA. This will happen when using a self-signed cert or the user connects through their own domain instead of the SSL certificate’s domain.
The Alternate SMTP Server Settings area displays the service status toggles for a secondary smtp server. Occasionally hosts want an alternate SMTP service which requires TLS, hence we provide the ability to set up a secondary SMTP server on port 587. In addition, hosts can enforce SMTP-AUTH since the secondary SMTP server will not be used to recieve mail from the outside. Finally, hosts don’t necessarily need to use port 587 - they can elect to use a different port which might be useful if one has ISP port restrictions.
Server Options
These are the “global” server options so to speak. All MTA operators should at least check these settings for correctness.
- Mail Server Hostname (FQDN)
This box allows you to change the name that your server uses to identify itself to other MTAs. As a caution, MTAs typically refuse mail from servers whose Mail Server FQDN doesn’t match the reverse DNS entry of the sending machine’s IP.
- Default Domain
The default domain appended to any address that doesn’t include a domain portion. For example, a user sending “FROM fred” instead of “FROM fred@domain.tld” will have this appended in place of their actual domain.
Bounce Options
Bouncing is when a user sends an email and it gets rejected or is determined undeliverable, the system notifies by sending the message back to the user notifying them of failure. The act of the message being sent and then being returned to the sender is analogous to a check bouncing and being returned to the check writer - You send something out and it comes back. Hence the name.
- Bounce From
The username that your server uses to return bad messages.
- Bounce Host
The domain that your server uses to return bad messages. Combined with the above produces a complete email address, user@host.
- Double Bounce Messages
If a message bounces, and is returned to a bad mail address, typically qmail will simply destroy or ignore the message without telling anyone. If you’d like a mailbox to gather information on incidents like that, however, enable Double Bounce here.
- Double Bounce To
The username on the local server of the mailbox that you wish to receive double-bounce messages.
- Double Bounce Host
The domain name of the double-bounce user above.
SMTP Inbound Options
- SMTP Greeting
This is the text shown to other MTAs when they connect to your server’s instance of SMTP.
- Inbound Connections (max)
The maximum number of concurrent incoming connections per SMTP server. If you have both incoming servers enabled, this number will be effectively doubled. 11
- Timeout
The amount of time, in seconds, until qmail-smtp closes a connection. Resets every time the server receives data.
- Message Size
Maximum file size for any incoming message, including attachments. Worth noting here is that it takes processor time, memory, bandwidth, and storage space to process very large email messages. This is somewhat dangerous in a shared environment, where you want to be fair to all e-mail users using your server.
MTA Level Outbound and Inbound E-Mail Address Blacklists
The MTA level blacklists allow you to block e-mail addresses at a very low level (SMTP-level on incoming, qmail-inject level on outgoing) so they are denied before further processing takes place.
Realtime (SBL) Blacklists
Realtime Server Black Lists are extensive databases of known unsolicited bulk mail providers. Attaching one or more Realtime SBL to your server can increase its efficiency at preventing spam, though excessive list additions might slow down mail transfer significantly.
SMTP Outbound Options
- Outbound Connections (max)
Also called “concurrency remote”, tells qmail the maximum number of outbound connections (i.e. qmail-remote processes) that it can have open at any one time.
- Response Timeout
This setting changes how long qmail will wait for a response to outgoing communications before closing a connection.
- Connect Timeout
Use this to set the number of seconds qmail will wait for an outbound connection to establish.
- Queue Lifetime
This defines the number of seconds a message can stay in the queue. The default is 604800 (one week). During this period, qmail will periodically attempt to re-send the message. After this time expires, qmail-send will try sending any message remaining in the queue once more, but it will treat any temporary delivery failures as permanent failures and bounce the message back to the user. 12
SMTP Routes
- SMTP Routes
This sets artificial SMTP routes.
This might not mean much to you, but essentially this setting 13 allows you to “override” the default behavior of the mail server to do a DNS lookup for a domain’s MX record and instead force delivery to a specific MX server. From qmail-remote’s man page and made more eloquent by us: Each route has the form domain:relay, without any extra spaces. If domain matches the host portion of an address, qmail-remote will connect to relay, as if the host had relay as its only MX. (It will also avoid doing any CNAME lookups on the recipient).
domain.com:alt1.aspmx.l.google.com
Relay may include a colon and a port number to use instead of the normal SMTP port, 25:
domain.tld:relay.tld:26
relay may be empty; this tells qmail-remote to look up MX records as usual.
domain.tld:
smtproutes may include wildcards:
:relay.tld
You can optionally combine an empty relay and wildcard to do interesting things like the following:
.domain.tld::relay.tld
Here any address ending with .domain.tld (but not domain.tld itself) is routed by its MX records; any other address is artificially routed to relay.tld.
Worth noting is that qmail does not protect you if you create an artificial mail loop between machines. However, you are always safe using smtproutes if you do not accept mail from the network (i.e. mail only goes one-way).
Configuring Mail Delivery Agents
The NodeWorx Mail Delivery Agent Configuration Page
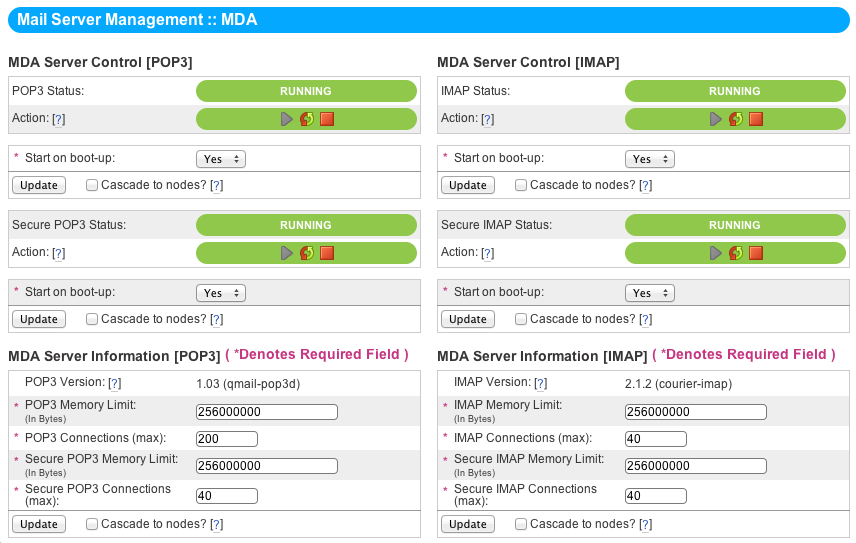
qmail-pop3d: POP3 and Secure POP3 servers
MDA Server Control
These blocks display the service status and activity toggles for qmail-pop3d and qmail-pop3d-ssl. They also permit the user to toggle whether or not the services start at boot.
MDA Server Information
The MDA Server Info [POP3] block gives software version information, as well as the following settings:
- POP3 Memory Limit
The maximum quantity of RAM that POP3 is permitted to utilize at once. 14
- POP3 Connections (max)
The number of simultaneous client connections that the POP3 server will accept. 15
- Secure POP3 Memory Limit
The maximum quantity of RAM that POP3-SSL is permitted to lock at once. 16
- Secure POP3 Connections (max)
The number of simultaneous client connections that the POP3-SSL server will accept. 17
courier-imap: IMAP4 and Secure IMAP4 servers
MDA Server Control
These blocks display the service status and activity toggles for courier-imap and courier-imapssl. They also permit the user to toggle whether or not the services start at boot.
MDA Server Information
The MDA Server Info [IMAP] block gives software version information, as well as the following settings:
- IMAP Memory Limit
- The maximum quantity of RAM that IMAP is permitted to lock at once.
- IMAP Connections (max)
The number of simultaneous client connections that the IMAP server will accept. 19
- Secure IMAP Memory Limit
The maximum quantity of RAM that IMAP-SSL is permitted to lock at once. 20
- Secure IMAP Connections (max)
The number of simultaneous client connections that the IMAP-SSL server will accept. 21
Configuring Spam Prevention System and Antivirus Agent
SpamAssassin
The NodeWorx Spam Filter Settings Page
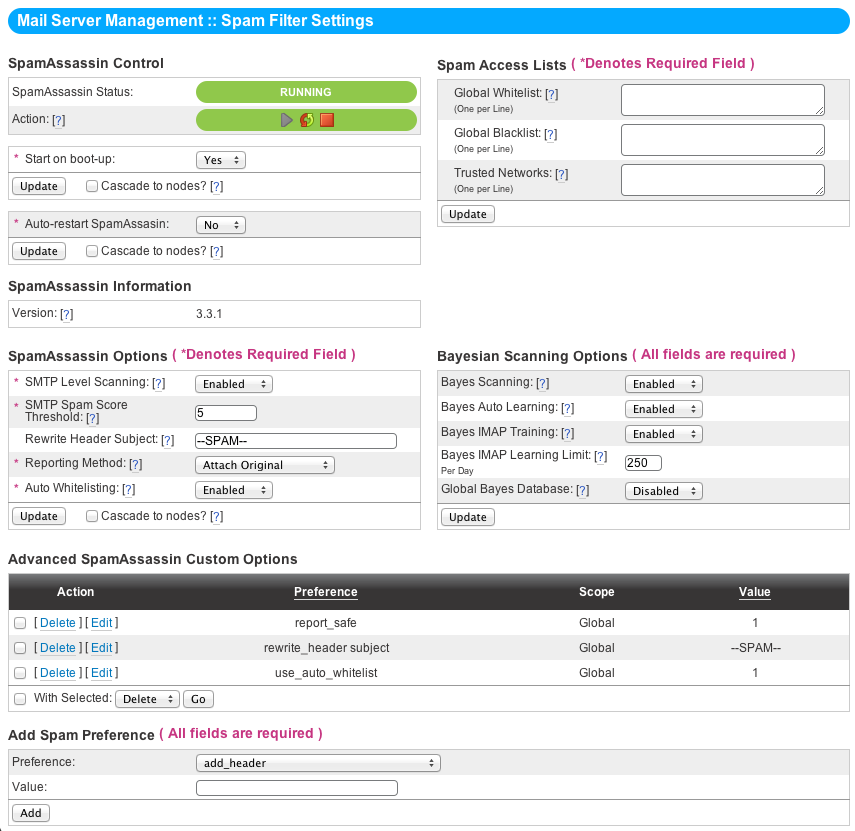
The basic controls for SpamAssassin are like those of any other service on an InterWorx machine - A service-running indicator and controls to start, stop, and restart service. Beneath that are the “Start on Boot” and “Auto-Restart” toggles, each of which is self-explanatory.
Basic SpamAssassin Options
- SMTP-Level Scanning
This option will scan all e-mail using the SpamAssassin content filter as the e-mail enters the server. The SMTP connection will be dropped only if the Spam Score is higher than the SMTP Spam Score option below. Otherwise, the e-mail will still be delivered to the recipient. The benefit to having this enabled is that any message that spamassassin can reasonably flag as spam will be rejected immediately before entering your server and being dropped on disk, most likely in a spam folder never to be seen again. On the other hand this will probably cause mail to be scanned twice - once as its entering via SMTP and again when it’s being delivered to the user’s mailbox.
- SMTP Spam Score Threshold
This is the SpamAssassin score threshold at which the SMTP server will reject a message before local delivery begins. Lower numbers are more agressive while higher numbers let more spam through. Low numbers may cause a lot of legitamate mail to be blocked at the SMTP level. It’s recommended you stay reasonable here and let most mail through and let scanning at the mailbox level take care of flagging whether a message is spam or not. That way, false positives still make it to the user albeit they might be tagged as spam.
- Rewrite Header Subject
Emails marked as Spam will have the email subject rewritten with what is entered here.
- Reporting Method
This option sets the method of delivering the actual e-mail spam message. The email can be sent unchanged but with the subject rewritten, it can be attached to an email from SpamAssassin, or it can be attached as plain text to an email from SpamAssassin.
- Auto-Whitelisting
Enable or disable the SpamAssassin AutoWhitelist functionality. AutoWhitelist tracks scores from messages previously received and weights the message score, either by boosting messages from senders who send good messages or penalizing senders who have sent bad messages previously.
Access Lists
The three access lists can be defined here, one address per line:
- White List
Use the whitelist textfield to enter email addresses or domains that are valid to send email from on a serverwide level.
- Black List
Use the blacklist textfield to enter email addresses or domains that are not valid to send email from on a serverwide level
- Trusted Networks
Relay hosts added here are considered to not be potentially operated by spammers, open relays or open proxies.
Bayesian Scanning Settings
Given training, bayes will learn which emails are most likely spam and most likely ham (not spam) and deal with these emails according to your preferences.
- Bayes Auto Learning
Use this dropdown to enable or disable Bayes auto learning. If enabled, the system will automatically train the Bayes database by analyzing messages that have a score that strongly suggests that they are spam or non-spam.
- Bayes IMAP Training
This dropdown enables or disables IMAP training. With Bayes IMAP training enabled, there will be two folders created for all e-mail accounts on the system: Learn Spam and Learn Ham. You can then put SPAM emails in the Learn Spam folder and non-spam in the Learn Ham folder. This will train the Bayes system on which emails are Spam and which are Ham (not Spam). The training occurs once daily, after which the folders’ contents are purged.
- Bayes IMAP Learning Limit (Per Day)
The maximum number of e-mails that will be trained from each of the IMAP Training Folders, Learn Spam and Learn Ham, each day.
- Global Bayes Database
If enabled, all the Bayes data will be stored as a single global user. If disabled, each e-mail box user will have their own Bayes database to store bayesian data. Disabled is considered more effective for fighting Spam, but requires all e-mail users to train their messages individually, and uses more disk space, compared to the global database option.
Advanced Preferences
Advanced configuration of SpamAssassin can be performed here. A reference for each of these tags and what they do can be found at:
ClamAV
The NodeWorx Virus Filter Settings Page
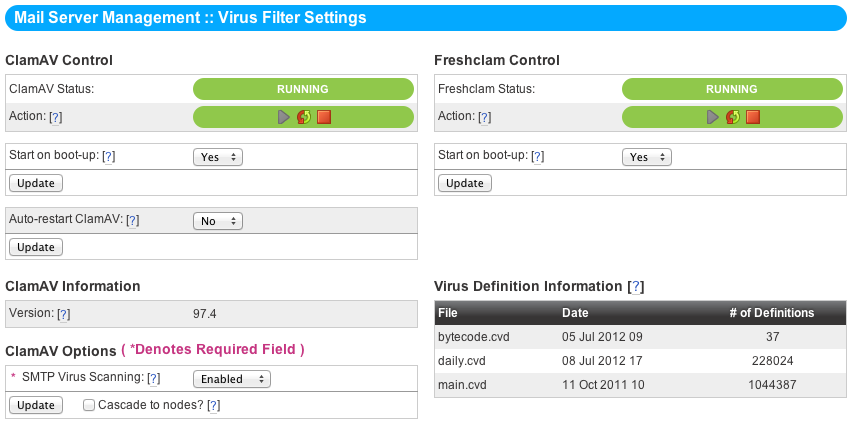
Much like the other services, ClamAV has a run indicator, start-stop-restart buttons, and “Start On Boot” / “Auto-Restart” options. Also on the configuration page for ClamAV is the service status for Freshclam, the malware definition update service.
SMTP Scanning
This toggle enables or disables virus scanning on the SMTP level. It’s recommended you enable this.
Freshclam
Freshclam should be enabled at boot and permitted to stay running. The Virus Definition Information block describes the current version of each of the three main ClamAV Virus Definition files and how many definitions are contained within each.
The Mail Queue
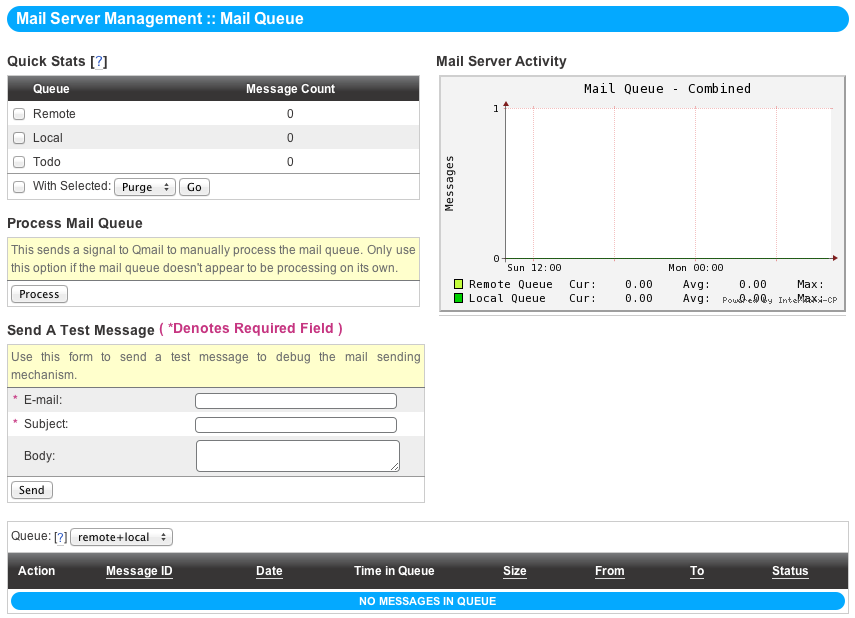
The NodeWorx Mail Queue Settings Page
qmail Queue
qmail’s core feature is its queue, a parallel mail processing environment that allows simultaneous transmission of, by default, 20 messages at any given time. The queue can even operate reliably over NFS without locking, permitting clustered InterWorx servers to each transfer mail in parallel.
Remote
The qmail remote queue feeds the MTA end of qmail - where messages go to leave the system. Any mail destined for a remote machine is placed into the Remote queue, and transmitted the next time the queue processes.
Local
Much as the Remote queue works for sending messages along to other machines, The Local queue arranges for deliveries via the two MDAs, passing messages on to them to be filed into the users’ Maildir directories on the local machine.
Todo
The Todo queue contains the envelope for each message in the Local or Remote queues. When enough messages have built up in Todo or a set quantity of time has elapsed, a signal is sent to qmail to process the queue.
Options and Diagnostics
Statistics
The Statistics block gives you a quick overview of the Local, Remote, and Todo queues, as well as the ability to purge one or all of them. Note: Purging the queue is NOT the same as processing the queue - Purging deletes all messages.
Processing
An option is given here to manually signal qmail to process the mail queue. Only use this option if the mail queue doesn’t appear to be processing on its own.
Testing SMTP Through Queue
The form in this block exists to allow a quick test of the qmail-inject, qmail-queue, and qmail-smtp software, dropping a message directly into the queue to debug and test sending.
Queue Failures
The qmail queue system is one of the more robust features of qmail. It is designed to be very reliable in that messages will not get corrupted nor will they get lost even due to a hard crash (unless the filesystem the queue lives on gets lost in which case you’ve got bigger problems).
Occasionally there can be problems with the queue. The queue is very delicate in that it should never be manipulated by an actual server administrator unless they understand the internal structure of the queue very well. The only things that should be manipulating the queue are the programs which comprise the qmail suite. As a result, InterWorx typically recommends that you simply dump the current queue and reset it when the queue is broken in order to get the mail system working again. 22
Resetting Queue
The qmail queue can be checked by visiting System Services > Mail Server > Mail Queue. Ideally you should rarely have to do this. It can be useful if you know that the permissions, timestamps, or other file attributes of the queue have been modified by something other than qmail programs and you are having issues sending/recieving mail. Additionally, if you are sitting on a large (1000+) set of spam messages in the remote queue this can stop that mail from being sent out. Keep in mind this will also affect legitamate mail sitting in queue. Thus, if you have many legitamate customers using mail constantly, resetting the queue is not the recommended way to clear out spam.
In any case, this procedure just moves the current queue out of the way such that it can be inspected later for legitimate mail “caught in the storm” so to speak:
cd /var/qmail- Change to the directory where the qmail queue exists.service smtp stop- Stop the qmail-smtp service.service send stop- Stop the qmail-send service.mv queue queue.bad- Move the damaged queue into a folder for later analysis or message recovery.yum reinstall qmail- Reinstall qmail, which automatically sets up a new queue with the appropriate parameters. This command does not change any of your qmail settings.service smtp start- Restart the qmail-smtp service.service send start- Restart the qmail-send service.
With that, your queue should be completely refreshed and ready to run again.
Command-Line Log Analysis Tools
With InterWorx 4.9, we introduced some new log analytics tools, hereafter referred to as qmail-tools. They’re a set of bash scripts that provide a more human-friendly readout for qmail’s logs. They convert the weird base64 timestamp formatting to something actually legible, but also allow you to break down the logs in almost any way you want to.
A brief word of caution before we begin. These logs operate only on the send level. If the mail you’re looking for never touched send, but died at the smtp level, then it won’t show up using these tools. With the power and flexibility of these tools you can do anything from find spammers to provide assurances to your users that their e-mails are in fact getting through to recipients.
Path Setup
The new qmail log analytics scripts are in ~iworx/lib/logtools/bin/. It’s probably easier to use them if you execute the following command first to drop them into your command path:
export PATH=$PATH:/home/interworx/lib/logtools/bin
That’ll let you access the tools regardless of what directory you’re in, though they do specifically refer to the qmail log files and won’t be able to analyze any other logfiles.
Selectors
There are two “selector” commands, each of which lets you select a range of time to examine the logs in. You MUST pipe the selector commands into an operator command to get anything useful - Running the tools by themselves just gets you a help page. Worth noting is that both tools use either epoch seconds, the UNIX date command, or a “human-friendly date stamp”, “fuzzy date”, sometimes called an “hstamp”. Hstamps come with a caveat: the user is not permitted to “mix” fuzzy dates. You cannot, for example, specify “3 days 12 hours 4 minutes”. You would need to do the math on that to get “5044 minutes”.
It’s worth noting that if you exceed the time frame allotted by qmail’s logs, it will give you an error that looks like this:
Warning: We only have logs dating back to <date of earliest log>.
qmail-last-x
The “qmail-last-x” command selects the logs for a time period starting however long ago until now. Hence “last x”, where x is any specified period.
Examples:
[root@host]# qmail-last-x “3 hours”[root@host]# qmail-last-x “5 minutes"[root@host]# qmail-last-x “6 days”
qmail-start-end
The “qmail-start-end” command lets you give two timestamps in which to gather logs, to the nearest hour’s precision. The last two examples will both give you data from November 4, 2011 20:00:00 EST to November 11, 2011 15:00 EST.
Examples:
[root@host]# qmail-start-end ‘hstamp ’5 hours ago’‘ ‘hstamp ’3 hours ago’‘[root@host]# qmail-start-end ‘date +%s -d2011-11-04 20:13‘ ‘date +%s -d2011-11-11 15:38‘[root@host]# qmail-start-end 1320438841 1321043679
Operators
So what does someone pipe these amazing, flexible selection commands into? Why, the search operators, of course. Search operators let you specify what you’re looking for within the specified time period. There are two different search operators, the “Show” and “Top” commands, and a special class of operator called an “X-Filter”.
Show
By default, the “Show” search operators don’t display the mail sender. The -detail version of each script, however, DOES show senders.
- show-all
Displays all successes, deferrals, and failures in the given time period.
[root@host]# qmail-start-end ‘date +%s -d2011-11-08 02:13‘ ‘date +%s -d2011-11-10 14:38‘ | show-all[root@host]# qmail-last-x ’12 hours’ | show-all-detail
- show-success
Displays all successfully delivered mail in the given time period.
- show-failures
Displays all failed transfers in the given time period.
- show-deferrals
Displays all deferred mails in the given time period.
Top
The important things to know about the “Top” search operators is that each is able to be sorted by field, and each comes in a “-local” and “-remote” flavor which can distinguish between locally-made and remote deliveries.
- top-recipients
Lists the users who have received the most mail in the specified time period.
- top-senders
Lists the users who have sent the most mail in the specified time period.
- top-deferrals
Displays a list of the users who have had the most deferrals.
- top-failures
Shows the users who have had the most failed deliveries.
- top-user-stats
Displays a combination of all statistics for all users.
- top-domain-stats
Displays a combination of all statistics for all domains.
X-Filters
X-Filters are inserted between the selector and operator in a log search and act like any other filter, permitting a narrower search.
- xrcpt
The “xrcpt” filter, when passed with a recipient e-mail address, narrows a search to only include that recipient address.
[root@host]# qmail-last-x ’6 days ago’ | xrcpt i.get.lots.of.spam@example.tld | show-all
- xsend
When paired with a sending e-mail address, “xsend” restricts searches to only contain that address.
[root@host]# qmail-start-end ‘hstamp ’20 hours ago’‘ ‘hstamp ’3 minutes ago’‘ | xsend mail-is-broken@example.tld | show-failures-detail
- xuser
Pass a UNIX username to “xuser” and it will look for records only on domains owned by that user.
[root@host]# qmail-start-end ‘hstamp ’1 week ago’‘ ‘hstamp ’3 seconds ago’‘ | xuser mailgag1 | show-deferrals
- xwebmail
“xwebmail” requires no arguments - It merely shows you all webmail usage.
[root@host]# qmail-last-x ’12 hours ago’ | xwebmail | show-all
Suggested Reading
Life with qmail - http://www.lifewithqmail.org/
qmail manual - http://www.qmail.org/qmail-manual-html/
- 1
DJB’s website can be found at http://cr.yp.to/
- 2
Qmail’s hompage is located at http://cr.yp.to/qmail.html
- 3
Courier IMAP’s website can be found at http://www.courier-mta.org/imap/
- 4
SpamAssassin’s website can be found at http://spamassassin.apache.org/
- 5
ClamAV’s website can be found at http://www.clamav.net
- 6
The reason to limit this is mainly if disk space or processor capacity is at a premium.
- 7
SMTP-Level Scanning will scan all e-mail using the SpamAssassin content filter as the e-mail enters the server. The SMTP connection will be dropped only if the Spam Score is higher than the SMTP Spam Score option below. Otherwise, the e-mail will still be delivered to the recipient.
- 8
Lower values here are stricter. If you’re worried about blocking legitimate mail, try 7. If even 5 lets in too much spam, drop it to 4.
- 9
The IMAP Leaning Limit sets a cap on how many e-mails users can submit to the Bayes engine in SpamAssassin for training as junk (spam) or not-junk (ham).
- 10
Important note: if SMTP-Level Virus Scanning is enabled and the virus scanner stops running for some reason, e-mail will not be delivered.
- 11
This value changes the tcpserver setting of the ucspi-tcp suite which is used to launch the program. http://cr.yp.to/ucspi-tcp/tcpserver.html
- 12
Messages will only stay in queue if the message is deferred - i.e. qmail is able to determine the IP address of the remote MX server and either the connection timesout, or qmail is able to connect but the remote server rejects the message saying try again later. This is typical when a mail server gets black-listed by free webmail providers like GMail or Hotmail. If the remote server responds that the user doesn’t exist, qmail can’t determine the mx server of the host portion of the address, or the delivery is local and the user doesn’t exist, qmail will immediately bounce the message back since those are considered permanent failures.
- 13
It’s not really a setting - it’s a file on disk that qmail reads from in /var/qmail/control
- 14
This value changes the softlimit setting of the daemontools suite which is used to launch the program. http://cr.yp.to/daemontools/softlimit.html
- 15
This value changes the tcpserver setting of the ucspi-tcp suite which is used to launch the program.http://cr.yp.to/ucspi-tcp/tcpserver.html
- 16
This value changes the softlimit setting of the daemontools suite which is used to launch the program.http://cr.yp.to/daemontools/softlimit.html
- 17
This value changes the tcpserver setting of the ucspi-tcp suite which is used to launch the program.http://cr.yp.to/ucspi-tcp/tcpserver.html
- 18
This value changes the softlimit setting of the daemontools suite which is used to launch the program. http://cr.yp.to/daemontools/softlimit.html
- 19
This value changes the tcpserver setting of the ucspi-tcp suite which is used to launch the program.http://cr.yp.to/ucspi-tcp/tcpserver.html
- 20
This value changes the softlimit setting of the daemontools suite which is used to launch the program. http://cr.yp.to/daemontools/softlimit.html
- 21
This value changes the tcpserver setting of the ucspi-tcp suite which is used to launch the program.http://cr.yp.to/ucspi-tcp/tcpserver.html
- 22
Part of the reason that manipulating the queue manually with cp/mv/rm commands is a bad idea is because the queue files are named based on the filesystem inode number - which obviously would change if you started moving stuff around. Not to mention qmail expects certain files to be in certain directories of the queue in order to know what state a message is in. An incorrect file state will lead to strange behavior - possibly the queue corrupting itself further.