Note
You are viewing the documentation for an older release of Interworx (6.x). To see documentation for the current generally available release of Interworx, click here: 7.13.
Clustering Guide
Preface
About This Guide
This is the InterWorx Clustering Guide, intended to provide server administrators with information on designing and setting up a cluster of InterWorx servers, as well as troubleshooting and repairing common problems.
To be able to use this guide most effectively, you will need to know the following:
How to log into a NodeWorx Account on your server
How to log into your server via SSH
Basic Linux skills (entering commands, passing parameters)
An understanding of how permissions work in Linux
How to edit text files in a commandline editor, such as vi, vim, emacs, or nano
Basic networking skills (establishing a network, configuring your selected network hardware)
What Is Clustering?
Clustering is a way for several servers to act as one. In a typical InterWorx cluster, one machine acts as the Cluster Manager (Master), and the other machines are set as Nodes (Slaves). The nodes mount the /home partition of the CM, so when someone comes to a site on the CM it will be load balanced across all of the boxes. All data continues to be stored on the CM server.
What Does Clustering Do? What Doesn’t It Do?
Clustering provides an increase in reliability and a decrease in latency for your users. A cluster will allow you to service more requests, do so more flexibly, and share load across many machines instead of focusing all of your customers’ needs onto one machine. If any node in the cluster goes down, customers won’t notice anything except for a slight drop in response time, depending on your traffic volume.
Clustering isn’t a “magic bullet” that keeps your files up to date on a large number of machines. It doesn’t do data replication or distributed filing. Clustering is not a replacement for a backup system.
Why Cluster?
The best reason to use an InterWorx cluster is load balancing. Storage is centralized, but service isn’t - While you only have one “live” storage pool to draw from, adding a node is a very simple and straightforward process, able to be done with an extremely light piece of hardware.
What About Redundancy or High-Availability Clustering?
Unfortunately, as yet we don’t have a deployable, real-world “ready for primetime” High-Availability Clustering solution. Our software engineering team is working hard on the feature, but as yet there is no ETA. There are still solutions for storage reliability improvement, despite the lack of High Availability.
System Requirements
Hardware
InterWorx itself has very light hardware requirements - Any machine capable of running CentOS Linux 5 or better can run InterWorx. Generally, the hardware you need is going to be highly dependent on how many domains you are planning on serving.
Cluster Manager
A Cluster Manager needs the following:
Two IP addresses: one for the public interface, one as the “quorum” IP which the other servers will use to address the CM, and which the CM will use to send commands to the command queues of the nodes.
Large storage device: either internal to the machine, or an externalized device mounted to the CM as /home.
Other than these basic features, you will need to consider the amount of processor capacity, RAM, and storage you will need. InterWorx’s clustering system is very robust in terms of storage management, and customers have had success with many different external or redundant storage systems. iSCSI, all manner of NAS and SAN devices, and even onboard RAIDs are simple enough to integrate as storage systems within InterWorx.
Here are a few typical setups. By all means, these aren’t hard-and-fast requirements, simply suggestions for basic hardware.
Light Profile (1-20 domains): 1x physical dual-core CPU, 4GB RAM, 1TB HDD
Medium Profile (20-80 domains): Cluster Manager: 2x physical quad-core CPUs, 8GB RAM, 2TB HDD
Heavy Profile (80-300 domains): Cluster Manager: 4x physical quad-core CPUs, 16GB RAM, 1TB HDD, 20TB RAID 10 iSCSI array
Nodes (each): 2x physical quad-core CPUs, 8GB RAM, 1TB HDD
Cluster Nodes
A Cluster Node is by necessity a much lighter machine than the Cluster Manager. While the CM manages storage and databases, maintains the connections between the nodes and balances the load across the network, nodes are tasked with only a single activity: servicing requests.
Light Profile (1-20 domains): 1x physical dual-core CPU, 2GB RAM, 250GB HDD per node
Medium Profile (20-80 domains): 1x physical quad-core CPU, 4GB RAM, 500GB HDD per node
Heavy Profile (80-300 domains): 2x physical quad-core CPU, 4GB RAM, 500GB HDD per node
Network
InterWorx uses theipvsadm load balancer provided by the Linux Virtual Server (LVS) project. It is a software load balancer that runs on Linux and FreeBSD systems and works very well as a general purpose load balancer. LVS allows for an array of load balanced setups including:
Software
In order to cluster with InterWorx, you will need CentOS, RedHat, or CloudLinux OS. Of course, InterWorx must be installed, and each server must have its own license key.
Network Setup
In this chapter, we’ll look at the different ways to set up an InterWorx cluster. It’s worth noting that clustering works the same from the user-interface perspective regardless of the LVS mode the user chooses. However, the examples here will be using LVS-DR as it is by far the most popular way to build an InterWorx Cluster.
Basic Network Configuration
A Basic, Single-Server InterWorx Installation
Figure 3.1 shows a basic single server hosting setup. All hosting services are handled by this single server. We break the services down into the following Roles: AppServer, (web, mail, dns, etc), File Server, and Database. In this setup, there is one network device on the server, and it is connected directly to the public network, which is then connected to the greater internet. This is not a clustered setup, it is a baseline from which we can expand into a clustered setup.

InterWorx Clustering With A Single NIC Per Application Server
The first thing to note in Figure 3.2 is the addition of an extra Role to first server - Load Balancer. This server can now load balance application requests to the other AppServers, or Nodes, in the cluster. Also, note the addition of the blue directional arrows, indicating intra-cluster communication. Since we are still using just the public network for this cluster, this means that one IP address on the Load Balancer server must be reserved for intra-cluster communication - this IP is called the quorum IP. At least one other public IP address must be assigned to the Load Balancer, which will be the IP(s) that hosting services utilize.
InterWorx Clustering With Two NICs Per Application Server
Figure 3.3 shows the addition of a second, private network for the cluster to utilize. The cluster will use the private network exclusively for intra-cluster communication. The quorum, that is, the IP address on the load balancer that the other servers use to communicate to the load balancer, is now a private IP address, rather than a public one. This removes the requirement of two public IP addresses for cluster load balancing to work.
InterWorx Clustering With Two NICs Per Application Server, And Separate File And Database Servers
Figure 3.4 shows a more advanced InterWorx Cluster setup, where the File Server and Database Roles have been moved to two separate servers connected to the rest of the cluster only via the private network.
Public vs. Private Network For Intra-cluster Communication
Intra-cluster communication refers to the sharing of site and email data between servers, commands being sent through the InterWorx command queue, and the routing of load balanced requests from cluster manager to nodes for processing. Before setting up your InterWorx Cluster, you must decide if you will use a private or public network for intra-cluster communication.
Public Intra-cluster Communication
Pros:
Requires only one network device per server.
Simpler setup.
Cons:
Must use 1 public IP as the cluster quorum IP, for intra-cluster communication.
If your network connection is throttled at the switch, you may hit throttle limit sooner.
Depending how your bandwidth usage is calculated by your provider, your intra-cluster communication may be billed.
Private Intra-cluster Communication
Pros:
Allows use of all public IPs for hosting services in the cluster.
Keeps cluster communication separate from public/internet communication.
Cons:
Requires use of 2 network devices for the cluster manager and cluster nodes.
Slightly more complex setup.
Home Directory Considerations
If you want a separate partition for /home on the InterWorx Cluster Node servers, you should name this partition /chroot instead, and symlink /home to /chroot/home. This will allow the shared storage mounts to mount cleanly.
Installation
Basic Installation
If using an external shared storage device
External NFS Server must support quotas through NFS (rquotad).
NFS export must be on a partition with a filesystem that supports quotas. That partition should be mounted with quotas enabled.
Install OS and assign IPs to NICs on all servers.
If using an external shared storage device (not the cluster manager) Create the NFS export on the fileserver or appliance.
Ensure that every intra-cluster communication IP in the cluster has access to this NFS share.
Configure /home on the cluster manager to point to this storage device via NFS. 4
Install InterWorx and activate your licenses on all servers.
Setup the cluster manager.
(Optional) Add all additional public IPs used to host servers to the same NIC which contains the primary public IP on the IP Management Page. 5
Add your cluster nodes using the private IPs (if you use the two network device scenario).
Test SiteWorx account creation by creating a temporary SiteWorx account to make sure that the clustering works properly.
You’re done!
Manager Setup
You should always set up the Cluster Manager first. Ideally, do so before you have any SiteWorx accounts installed on it.
In NodeWorx, open the Clustering menu item if it is not already open.
Click the Setup menu item.
Click the Setup button under InterWorx-CP Cluster Manager to begin the process.
Choose the quorum IP from the list of available IP addresses.
The quorum IP is the IP address that will be used by all nodes in this cluster to communicate with the manager (and vice versa).
The quorum IP will not be available to use for website accounts.
Verify that you have sufficient space on the /home partition as listed on the Cluster Manager setup page.
This will be the single storage device for all nodes in your cluster.
Press the Complete button to complete the setup of the Cluster Manager.
Node Setup
You MUST set up the Cluster Nodes before they have any SiteWorx accounts installed.
Node Preparation
On the Node, in NodeWorx, open the Clustering menu item if it is not already open.
Click the Setup menu item.
Click the Setup button under InterWorx-CP Clustered Server to begin the process.
Copy the API key text blob to your local clipboard as you will need the copied API key for the next step.
Proceed to the next section.
Adding a Node to a Cluster
1. In NodeWorx on the Cluster Manager, open the Clustering menu item if it is not already open.
Click the Nodes menu item.
Enter the hostname or IP address of the Node you are adding to the hostname field.
Enter the API key from the previous procedure into the Node API Key field.
- It is recommended that you test your setup using the Test button.
After a successful test run 7 press the Add button to complete the node addition.
The add will return with either: “Node added successfully” or an error regarding what happened at the top of the screen. 8
Removing a Node from a Cluster
Sometimes, a node needs to be taken out of service permanently. Elegantly removing it from the cluster prevents a great deal of problems that can result in damage to your customers’ data.
In NodeWorx, open the Clustering menu item if it is not already open.
Click the Nodes menu item.
Mark the checkbox that corresponds to the Node or Nodes you’d like to delete.
Select “Delete…” from the drop-down list at the bottom of the Node Management table.
Click “Remove.”
The Load Balancer
The load balancer works by having all nodes in the cluster share one or more IP addresses, which InterWorx Control Panel uses to host websites as it normally does. This sharing is managable since none of the Clustered Nodes answer ARP requests from your network infrastructure. The Cluster Manager answers any ARP requests for the clustered IP address and then decides which of the Clustered Nodes will actually be servicing the request. The Cluster Manager then forwards the request to the Node which will service it by doing address translation.
It is possible to change which services a given node provides by manipulating the load-balancer policies for various services. This is done from the Cluster Manager, and is not possible to do from a Node.
Changing the Default Load-Balancing Policy
In NodeWorx, open the Clustering menu item if it is not already open.
Click the Load Balancing menu item.
Select the new default policy you would like to set from the drop-down list in the Load Balancer Information table.
Press the Update button to commit your changes.
Adding a Load-Balanced Service
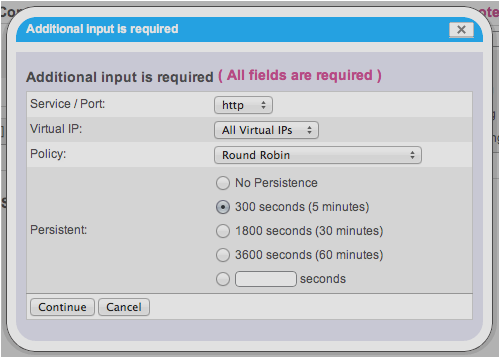
The Add Service Dialog, Part 1
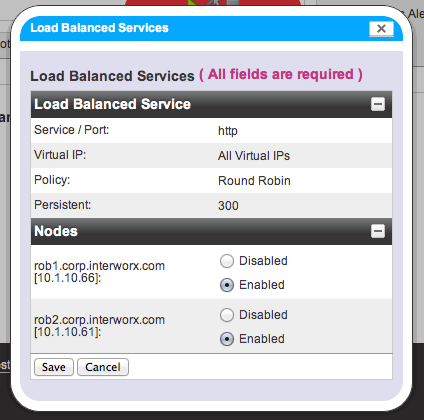
The Add Service Dialog, Part 2
In NodeWorx, open the Clustering menu item if it is not already open.
Click the Load Balancing menu item.
Click ’Add Service’ next to Load Balanced Services.
Select the service you wish to balance from the dropdown.
Select the Virtual IP you wish to load-balance the service for from the dropdown.
Choose the Load Balancing Policy from the dropdown.
Select your persistence value from the radio button list.
Press the Continue button to proceed to node selection.
Enable or disable nodes that will serve requests.
Click ’Save’ to commit your changes.
Deleting a Load-Balanced Service

The Delete Service Confirmation Dialog.
In NodeWorx, open the Clustering menu item if it is not already open.
Click the Load Balancing menu item.
Select the check box next to the service you wish to delete.
Press the ’Delete Selected Services’ button.
Press ’Delete’ to commit your changes.
- 1
More information on LVS-NAT can be found at http://www.linuxvirtualserver.org/VS-NAT.html
- 2
More information on LVS-DR can be found at http://www.linuxvirtualserver.org/VS-DRouting.html
- 3
More information on LVS-TUN can be found at http://www.linuxvirtualserver.org/VS-IPTunneling.html
- 4
Note: If this shared storage device is mounted after InterWorx is installed, you may need to create the following symlinks:
/home/interworx to /usr/local/interworx
/home/vpopmail to /var/vpopmail
- 5
This can be done after the cluster is setup if you wish.
- 6
Doing a pre-addition test weeds out 90% of Node addition errors that can occur.
- 7
Successful tests are denoted by the message: “Node passed all pre-cluster tests” at the top of the screen.
- 8
Node addition may take from several seconds to many minutes depending on the network speed and Manager/Node server speed.