How To: Manage IPv6 Pools in NodeWorx
From the IPv6 Pools page in NodeWorx, Server Administrators can manage IPv6 pools for the server.
Managing IPv6 Pools
To Add an IPv6 Pool
Log into NodeWorx from the browser (https://ip.ad.dr.ess:2443/nodeworx)
From NodeWorx, navigate to Server > IP Management > IPv6 Pools

Under IPv6 Pools, click the +. This opens the Add IPv6 Pool form

Update the required fields:
Nickname: The name used to identify the pool
Pool Range: Use Classless Inter Domain Routing (CIDR) notation to designate a block of IPs to use in the pool - for example, 2001:db8::/32. The CIDR is used to define the size of the pool to pull from, not the netmask of the resulting IPs
Netmask: Netmask to use with IPs pulled from the pool
Subpool Size: This value determines the size of smaller, dedicated subpools that will be generated from the parent. Each subpool will be dedicated to a single SiteWorx account, allowing easier management of IPv6 networking. To disable the feature, leave the Subpool Size the same as the CIDR of the Pool itself
Device: The network device the IPv6 Pool is associated with
Gateway: The gateway to use for the IPs pulled from the pool
Distribution Policy: The Distribution Policy controls how IPv6 Addresses are assigned from the pool
Random: Addresses will be assigned randomly
Sequential: Addresses will be assigned in sequence
Reseller ID: Which resellers have access to the pool
Available to All Resellers: IPv6 pool is available to all resellers
{Specific Reseller Name}: IPv6 pool is only available to this specific reseller
Click Save
To Edit an IPv6 Pool
Log into NodeWorx from the browser (https://ip.ad.dr.ess:2443/nodeworx)
From NodeWorx, navigate to Server > IP Management > IPv6 Pools
Under IPv6 Pools, click the Pencil next to the pool. This opens the Edit IPv6 Pool form
Updated the desired fields
Pool Range, Subpool Size, and Distribution Policy cannot be changed

Click Save
To Delete an IPv6 Pool
From the IPv6 Pools List
Log into NodeWorx from the browser (https://ip.ad.dr.ess:2443/nodeworx)
From NodeWorx, navigate to Server > IP Management > IPv6 Pools
Under IPv6 Pools, click the Trashcan next to the pool. This opens the confirm deletion form

Click Delete
From the With Selected Dropdown
Log into NodeWorx from the browser (https://ip.ad.dr.ess:2443/nodeworx)
From NodeWorx, navigate to Server > IP Management > IPv6 Pools
Under IPv6 Pools, select the checkbox next to the pool
Select Delete from the With Selected dropdown
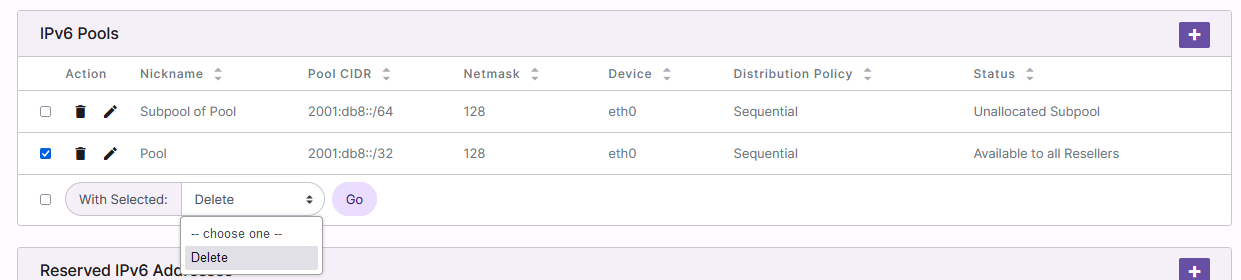
Click Go. This opens the Confirm Deletion form
Click Delete
Managing Reserved IPv6 Addresses
To Add a Reserved IPv6 Address Range
Log into NodeWorx from the browser (https://ip.ad.dr.ess:2443/nodeworx)
From NodeWorx, navigate to Server > IP Management > IPv6 Pools
Under Reserved IPv6 Addresses, click the +. This opens the Add Reserved Ipv6 form

Update the required fields:
Use Classless Inter Domain Routing (CIDR) notation to designate a block of IPs to use in the pool - for example, 2001:db8::/32. The CIDR is used to define the size of the pool to pull from, not the netmask of the resulting IPs
Range Start: The start of the range
Range End: The end of the range
Note (Optional): A short description
Click Save
To Edit a Reserved IPv6 Address Range
Log into NodeWorx from the browser (https://ip.ad.dr.ess:2443/nodeworx)
From NodeWorx, navigate to Server > IP Management > IPv6 Pools
Under Reserved IPv6 Addresses, click the Pencil next to the range. This opens the Edit Reserved IPv6 form
Update the desired fields

Click Save
To Delete a Reserved IPv6 Address Range
From the IPv6 Pools List
Log into NodeWorx from the browser (https://ip.ad.dr.ess:2443/nodeworx)
From NodeWorx, navigate to Server > IP Management > IPv6 Pools
Under Reserved IPv6 Addresses, click the Trashcan next to the range. This opens the confirm deletion form

Click Delete