How to: Import Hosting Accounts to InterWorx
Note
Supported control panels are InterWorx, cPanel, and Plesk.
InterWorx includes built-in import tools to facilitate easy migration between servers.
These tools include:
Mass Import Tool: Uses SSH to access a remote server to import multiple accounts
Can be used to import from InterWorx and cPanel
Can only be performed from NodeWorx
Allows the ability to import either full or structure-only backups
Migration Tool: Uses SSH to access a remote server to import multiple accounts
Can be used to import from both InterWorx and cPanel
Can only be performed from NodeWorx
Allows the ability to re-sync accounts
Allows the ability to customize import data
Single Account Import: Imports a single account backup
Can be used to import from InterWorx, cPanel, and Plesk (via the Plesk import tool)
Can be performed from NodeWorx and via the CLI (InterWorx and cPanel, only)
Importing Multiple Accounts
Using the Mass Import Tool
Log into NodeWorx from the browser (https://ip.ad.dr.ess:2443/nodeworx)
In NodeWorx, navigate to SiteWorx > Import
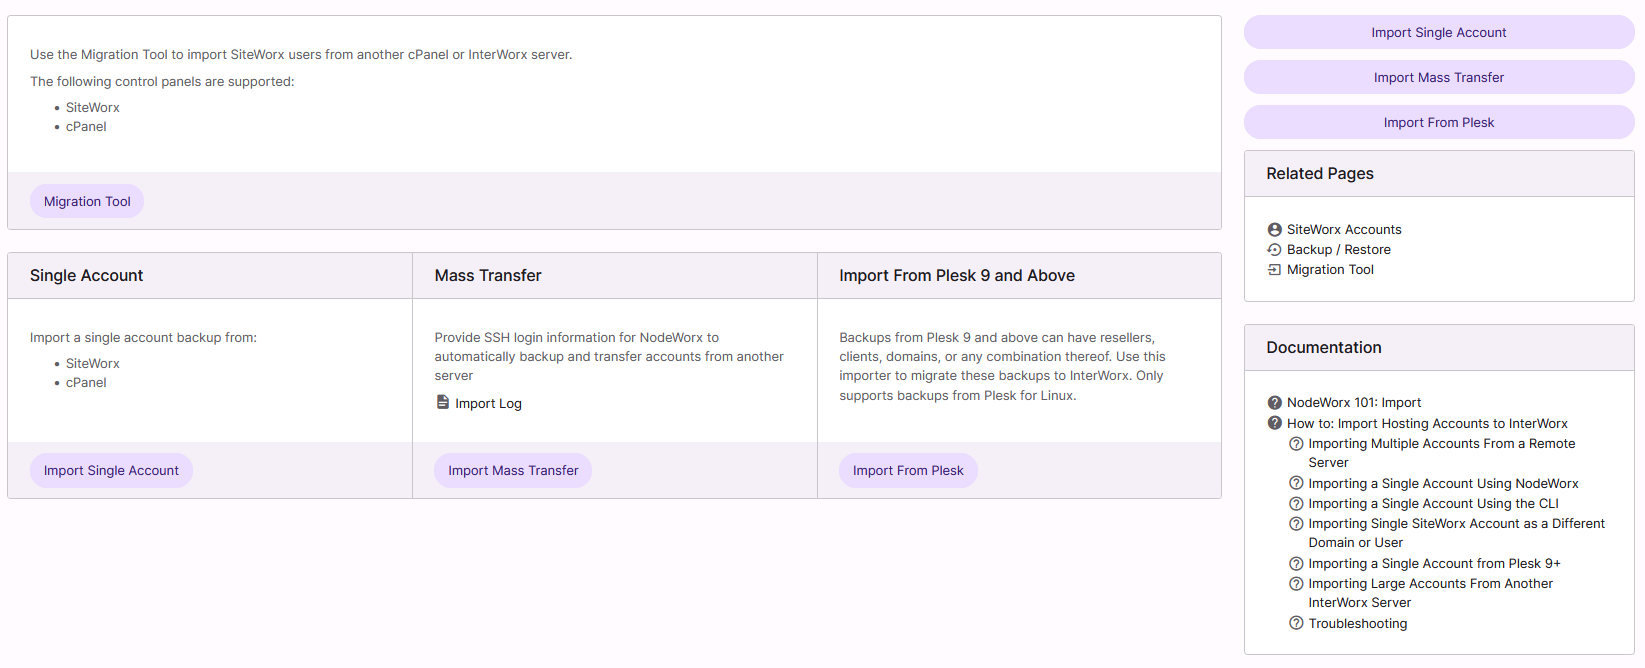
Click Import Mass Transfer. This opens the Mass Account Transfer form
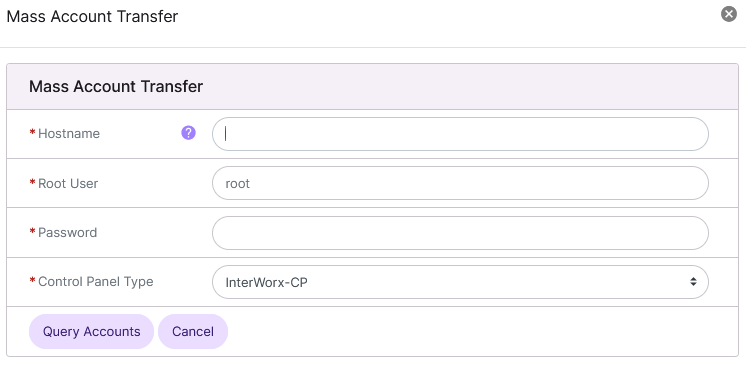
Update the required fields:
Hostname: The IP or hostname of the Remote/Source server
Note
The mass transfer is initiated via SSH, so if the Remote/Source server is running SSH on a non-standard port, that port can be designated by using <hostname>:<port number>
For example, if the Remote/Source server, ‘source.hostname.com’, has SSH on port 2200, it would be entered as source.hostname.com:2200 in the Hostname field.
Root User: The root user of the Remote/Source server
Password: The password for the root user of the Remote/Source server
Click Query Accounts. This opens the Mass Import page
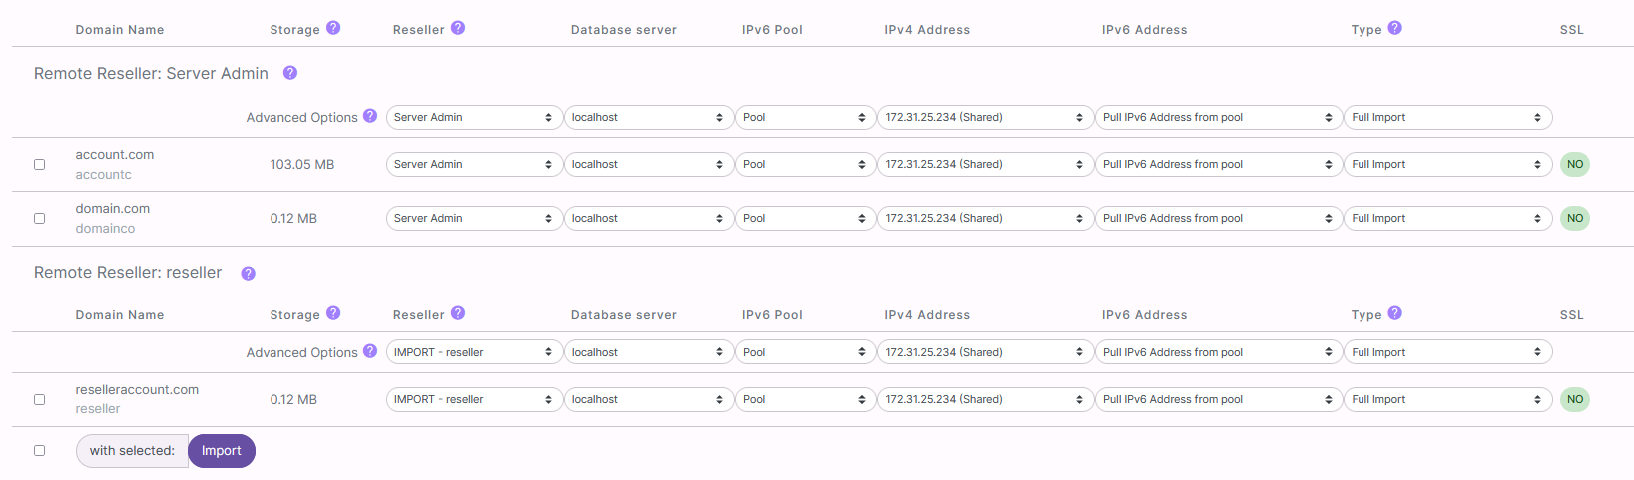
There are several information fields and optional dropdown menus for each account
Storage: The approximate amount of disk space the account is using on the Remote/Source server
This field will only show accurate information is quotas are enabled on the Remote/Source server. Otherwise it will show 0.00 MB
Reseller: The reseller the account will be imported under
If the remote reseller does not already exist on the destination server, there will be the option to import the remote reseller
If the reseller in the backup file already exists, the account will automatically be imported under that reseller
Database Server: The database server the imported account will use
IPv6 Pool: The IPv6 pool the imported account will use
IPv4 Address: The IPv4 address the imported account will be assigned to
IPv6 Address: The IPv6 address the imported account will be assigned to
Type: Allows the choice between either a “Full” or “Structure-Only” import
Structure-only imports are much smaller and faster than full imports, but only import SiteWorx account related information (such as quotas, usernames, passwords) and not actual data (such as website data files, database data, and email files)
Structure-only imports are especially useful when mass-transferring large accounts, since large accounts can take a considerable amount of time to mass-transfer
SSL: States whether the account has an SSL certificate on the remote server
Let’s Encrypt certificates are not included in the backup or import of SiteWorx accounts due to DNS requirements
At the top of each section is a row of Advanced Options dropdowns. Options selected from this menu bar will be applied to all of the accounts on the list
Select the accounts to be migrated by clicking the checkbox next to each account
Click Import. This refreshes the page to show the status of each of the chosen accounts’ import process:
In Progress: Account is currently being backed up non the Remote/Source server, transferred to the Local/Destination server, and imported into the InterWorx Control Panel
Pending: Account is waiting for the import process to begin
Success: Import of account succeeded
Failure: Import of account failed. A message that indicates possible reasons for failure will appear beneath the message

The page will automatically reload to update the import status of each account.
When the mass transfer process is complete, all accounts will either have a Success or Failure status in the Import Status column.

Note
If the page is closed, the mass transfer will still continue in the background. However, when returning to the page, the account status information will no longer be shown.
Troubleshooting the Mass Import Tool
“Permission Denied” error after clicking Query Accounts:
-Check to make sure the following:
The root password is correct
The root username is correct
SSH is enabled for the root user on the Remote/Source server
Imports fail with an “Invalid Password” error
The most common cause of this error is that passwordless/keyless SSH is set up between the two servers
Disable passwordless/keyless SSH and try the import, again
Using the Migration Tool
Note
NOTE: The InterWorx Migration Tool is under active development. This Beta version has been released for QA testing and feedback.
Creating the Migration Plan
Log into NodeWorx from the browser (https://ip.ad.dr.ess:2443/nodeworx)
In NodeWorx, navigate to SiteWorx > Import
Click Migration Tool. This opens the Migrations page

Click +. This opens the Add Migration Form

Update the required fields:
Hostname: The IP or hostname of the Remote/Source server
User: The root user of the the Remote/Source server
Port: The SSH port for the Remote/Source server
Authentication: The type of authentication that will be used to access the Remote/Source server
Password: The password for the user of the Remote/Source server
Nickname: A nickname for the migration
Click Save. This will access the Source server and pull in the account information. Once that is complete, the page will refresh and the new server will show in the list

Note
While the status next to the account says “Running”, that just means it is connected to the Remote/Source server. The migration will not start until the steps listed under Managing the Migration Plan and Importing Accounts are completed.
Managing the Migration Plan
Log into NodeWorx from the browser (https://ip.ad.dr.ess:2443/nodeworx)
In NodeWorx, navigate to SiteWorx > Import
Click Migration Tool. This opens the Migrations page
Click Open next to the server. This opens the Manage Accounts page:
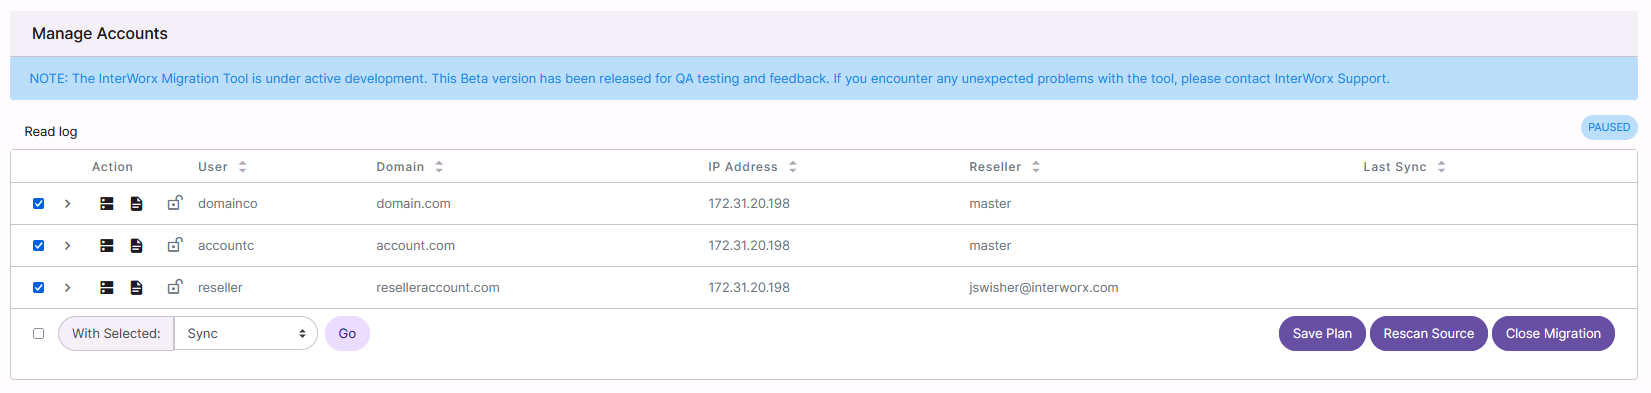
Click the arrow next to the account, this provides several options to customize the import for that account. Select the checkbox(es) next to the desired options:
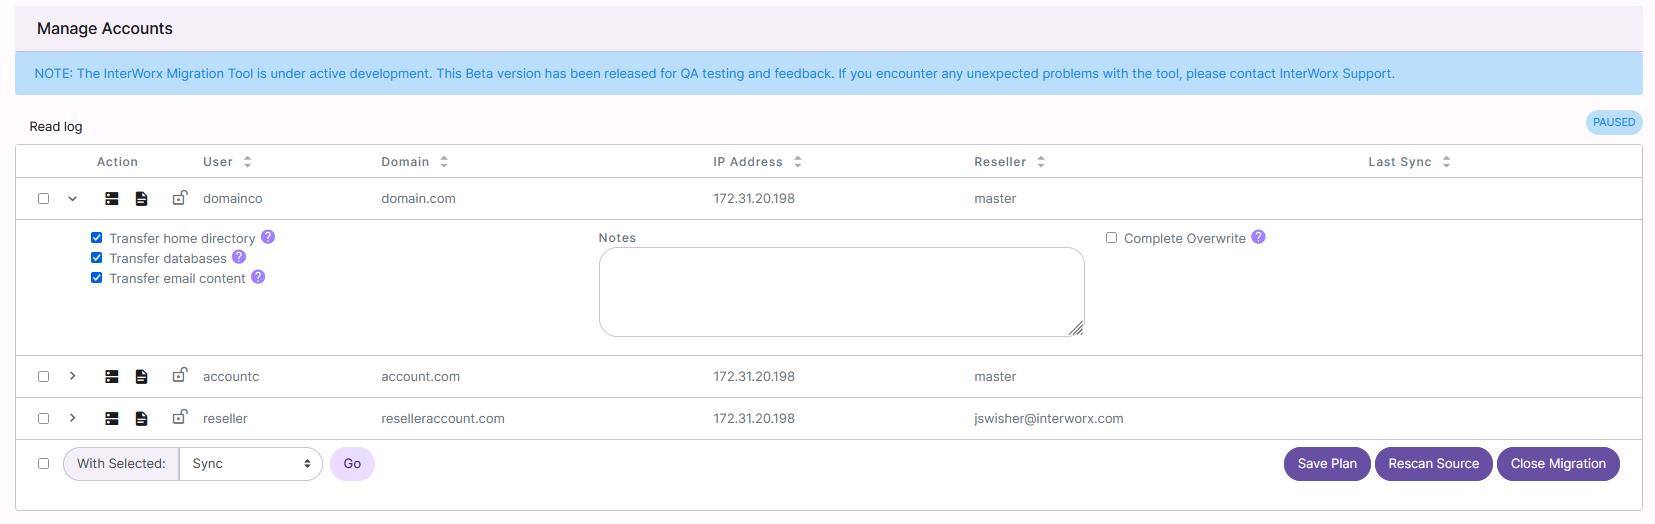
Transfer home directory: Imports or syncs the home directory
Transfer databases: Imports or syncs the databases
Transfer email content: Imports or syncs email messages
Complete Overwrite: Overwrites all existing data that may have already been imported for the account
Click the button next to the desired option
Save Plan: Saves the migration plan
Rescan: Scan the Source server again for other accounts and updated account info
Close Migration: Closes the connection and stops the migration process
Note
It is not possible to re-open a migration plan after it is closed. Please do not close the migration plan until the migration is complete.
Importing Accounts
Log into NodeWorx from the browser (https://ip.ad.dr.ess:2443/nodeworx)
In NodeWorx, navigate to SiteWorx > Import
Click Migration Tool. This opens the Migrations page
Click Open next to the server. This opens the Manage Accounts page:
Select the checkbox(es) next to the account(s)
Selecting the checkbox next to the With Selected dropdown will automatically select all accounts
Select Sync from the With Selected dropdown
Click Go
Importing a Single Account
To Import a Single Account Using NodeWorx
Log into NodeWorx from the browser (https://ip.ad.dr.ess:2443/nodeworx)
In NodeWorx, navigate to SiteWorx > Import
Click Import Single Account, in either the sidebar or the main page. This opens the Select Reseller form
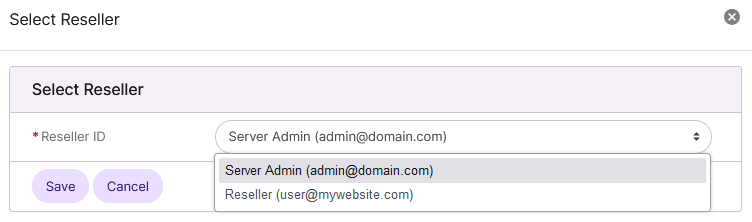
Select the reseller from the Reseller ID dropdown
Click Save. This opens the Single Account Import form
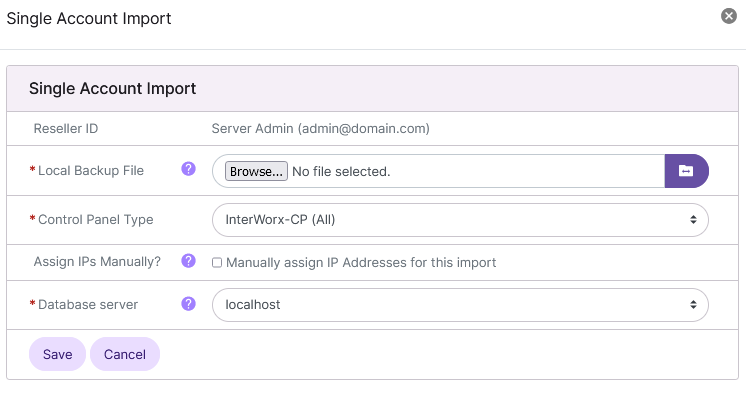
Update the required fields:
Local Backup File: The single backup file. There are two options:
Click Browse to choose a backup file on the local machine hard drive
Click the Folder Icon to specify the path to a backup file located on the destination/local server
Control Panel Type: The control panel that created the backup
IP Address: The new IP address for the account
If the backup is from another InterWorx server, the IP address can also be assigned manually by clicking the checkbox next to Assign IPs Manually
Database Server: The database server the imported account will use
Click Next. This opens the confirmation form
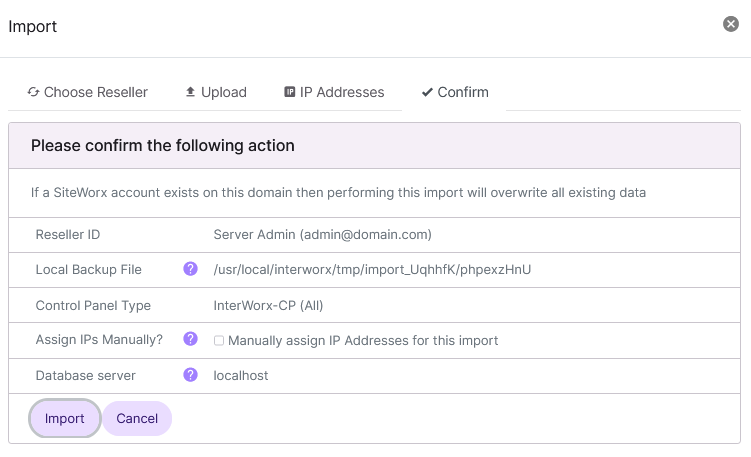
Click Import
To Import a Single Account Using the CLI
The CLI method of importing accounts to an InterWorx server is less user-friendly than doing so through NodeWorx,but it offers more options and flexibility.
Log in to the server at the CLI as root, either via SSH or from the terminal
Run the InterWorx import script. It has three required parameters:
~iworx/bin/import.pex --archive {/path/to/backup} --ip-address {ip.for.bac.kup} --control-panel {control-panel}
Parameter |
Description |
|---|---|
|
Path and filename of backup file to import. |
|
IP address to use for the imported account. The IP address must be a valid shared or unused dedicated IP address. inifile is also a valid input for this parameter when importing a SiteWorx account (uses old IP found inside backup) |
|
Indicates the control panel from which this backup was created. Valid values:
|
For example, to import a backup located at /tmp/backup.tar.gz, that was created from another InterWorx server, and will be assigned to the IP 10.1.10.99, run:
[iworx@server ~]$ ~iworx/bin/import.pex --archive=/tmp/backup.tar.gz --control-panel=siteworx --ip-address=10.1.10.99
There are also optional flags that may be used when importing the account. Some common examples:
Parameter |
Description |
|---|---|
|
Tells import.pex to force the restore which will delete any existing SiteWorx account, without a confirmation prompt, before restore proceeds. This is necessary when trying to revert to an older state of a SiteWorx account from a backup. |
|
Tells import.pex to assign the account to a particular reseller account. If this parameter isn’t used the account will be assigned to the NodeWorx administrator. |
|
Tells import.pex to create the reseller that’s stored in the backup file. If the reseller in the backup file already exists, the account will automatically be imported under this reseller. |
A full list of options and flags can be seen by adding the -h or --help flag to the command:
[root@server ~]# ~iworx/bin/import.pex -h
--archive is required
--control-panel is required
Usage: import.php [ options ]
--archive <string>                Path and filename of the backup file to import
--control-panel <string>          Indicates the control panel from which this backup was created.
Available Options: cpanel, directadmin, ensim, plesk, siteworx
--ipv4 <string>                   IPv4 Address to use for the domain being imported.
--ipv6 <string>                   IPv6 Address to use for the domain being imported.
--ipv6_pool <string>              IPv6 Pool to use.
--old-ipv4 <string>               Original IPv4 Address for the domain being imported.
--old-ipv6 <string>               Original IPv6 Address for the domain being imported.
--ip-map <string>                 Some backup types support an explicit map of IPs
--ip-map-md5 <string>             File containing MD5 Checksum of ip-map file
--db-server <string>              The nickname of the database server to be used for importing the account
--create-reseller                 Create the reseller that’s stored in the backup file.
--reseller-id <integer>           If this parameter isn't used the account will be assigned to the NodeWorx administrator.
--ip-type <string>
--force                           Will delete any existing SiteWorx account, without a confirmation prompt, before restore proceeds.
--no-restart                      Prevent the web server from restarting after import.
--quiet                           No output from import
--master-domain <string>
--import-domain <string>
--siteworx
--nofull
--preserve-siteworx-account       Import over the existing SiteWorx account.
--override-master-domain <string> Create the backup using a different master domain name
--override-unix-user <string>     Create the backup using a different unix username
--move-defaults                   Move and chown/chmod defaults file for an import
--defaults-source <string>        Source file
--defaults-dest <string>          Destination file
--defaults-group <string>         Group
--help                            Print this help message
--verbose                         Provide verbose output if possible
--no-color                        Suppress colorized output
--force-color                     Forces colorized output.  Overrides --no-color
[root@server ~]#
To Import a Single SiteWorx Account as a Different Domain or User
SiteWorx backups can be imported as a different master domain or unix user than what is listed in the backup.
This is useful if importing to a Destination/Local server where a domain or user with the same name already exists.
Note
This options only applies to backups that do not contain secondary domains
Log in to the server at the CLI as root, either via SSH or from the terminal
To override the master domain, run the import script with the
--override-master-domainflag and what the new domain should be~iworx/bin/import.pex --archive {/path/to/backup} --ip-address {ip.for.bac.kup} --control-panel {control-panel} --override-master-domain {new-domain}
To override the unixuser, run the import script with the
--override-unix-userflag and what the new unix user should be~iworx/bin/import.pex --archive {/path/to/backup} --ip-address {ip.for.bac.kup} --control-panel {control-panel} --override-unix-user {new-unix-user}
To Import a Single Account from Plesk 9+
Note
Due to file structure differences, there is a separate single account importer in NodeWorx for accounts imported from Plesk.
Log into NodeWorx from the browser (https://ip.ad.dr.ess:2443/nodeworx)
In NodeWorx, navigate to SiteWorx > Import
Click Import from Plesk in either the sidebar or the main page. This opens the Import from Plesk form
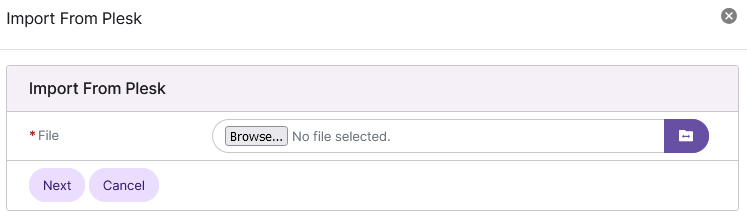
Update the required field:
Local Backup File: The single backup file. There are two options:
Click Browse to choose a backup file on the local machine hard drive
Click the Folder Icon to specify the path to a backup file located on the destination/local server
Click Continue. This opens the next step in the import form
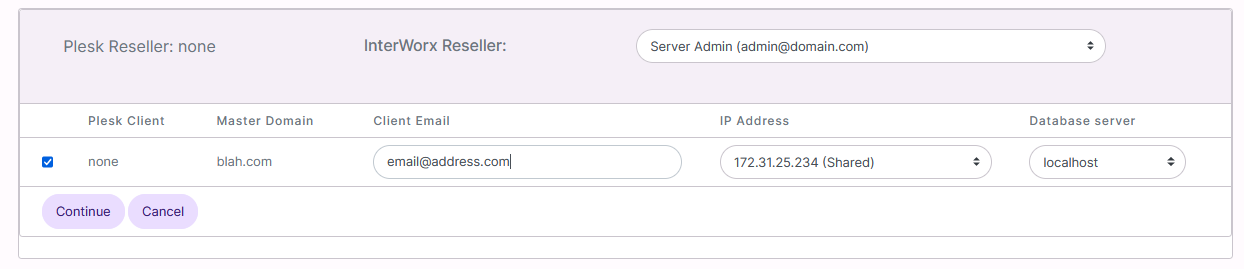
Update the required fields:
Reseller ID: The reseller the account will be listed under
Client Email: The email address associated with the account
IP Address: The IP address the account will be assigned to
Database Server: The database server the imported account will use
Click Continue. This opens a popup with the output of the import process
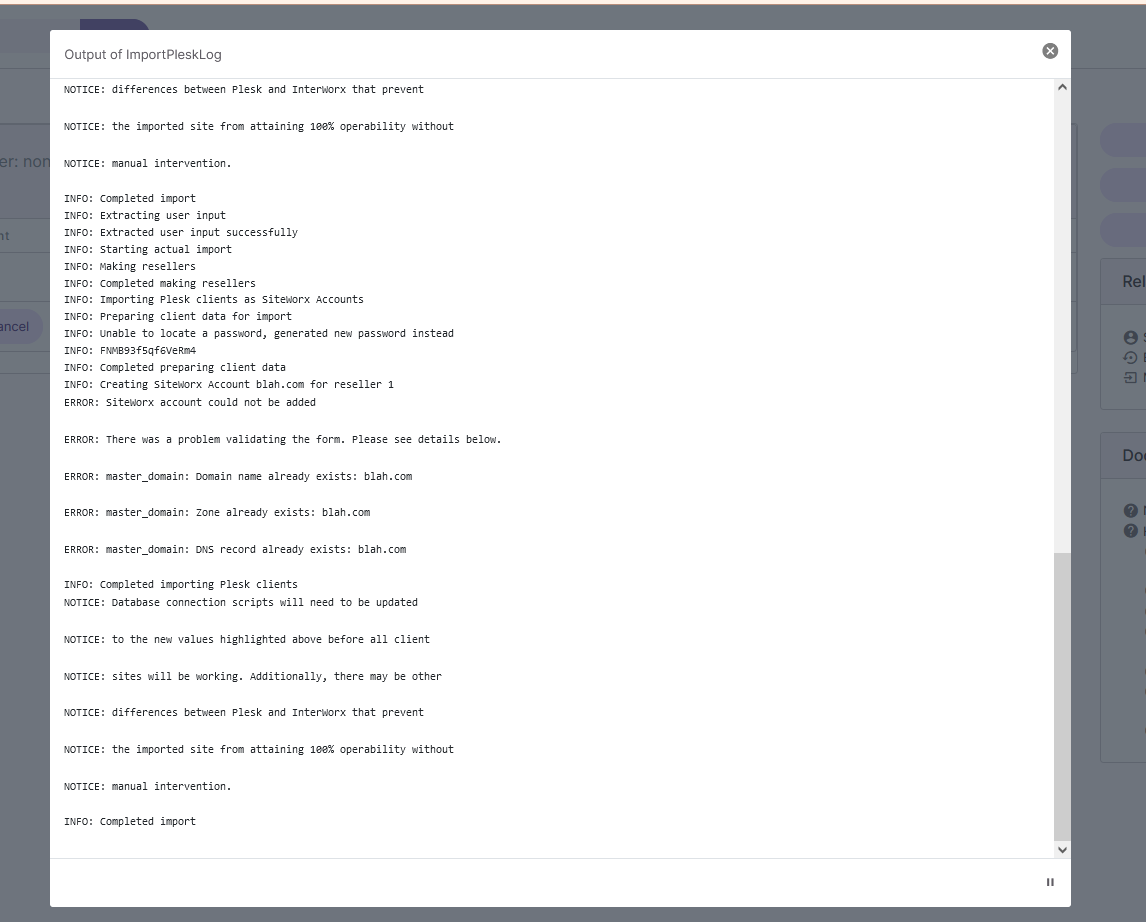
Once the output shows that the import completed, click X to close the popup
Note
The import form does not automatically refresh back to the main import page once the import is complete. To navigate away from the form, click any other link on the leftside menu
Importing Large Accounts From Another InterWorx Server
Note
Using the Migration Tool is recommended when importing large accounts, as that tool can handle large imports without breaking them into smaller parts.
When using the Mass Transfer tool, or Single Account Import tool to import a large SiteWorx account from another InterWorx server, it is common for the process to time out or fail before the import is complete. As such, it is recommended to import large accounts incrementally, instead.
On the Source server, create a Structure-Only backup of the SiteWorx account, either from the SiteWorx interface or via the CLI
Transfer the Structure-Only backup from the Source server to the Destination server, using a service such as SCP, Rsync, FTP, etc.
Using either the Single Account Import tool in NodeWorx , or the CLI, import the Structure Only backup. This will create the basic structure of the SiteWorx account, including email addresses, FTP accounts, database names and database users. It will not include data such as web files, email messages, or database tables and contents
On the Source server, create a Partial backup of the SiteWorx account either from the SiteWorx interface or via the CLI. This backup should contain the smaller data items for the account. For example, if the bulk of the account consists of email messages, the partial backup should specify only the web files and databases
Transfer the Partial backup from the Source server to the Destination server, using a service such as SCP, Rsync, FTP, etc.
Using either the Single Account Import tool in NodeWorx, or the CLI, import the Partial backup. This will import the data items that were specified
Manually transfer the remaining data items from the Source server to the Destination server using a service such as Rsync or FTP. The file locations and permissions should match the locations and permissions on the Source server