Note
You are viewing the documentation for an older release of Interworx (8.1). To see documentation for the current generally available release of Interworx, click here: 8.2.
Firewall Guide
The InterWorx Control Panel integrates with the APF iptables firewall system.
From the Firewall page in NodeWorx, server administrator have fine grained control over the firewall configuation on the server, including individual port control, and global IP access and deny lists.
Contents
To Manage the Firewall
Checking Firewall Status
Log into NodeWorx from the browser (https://ip.ad.dr.ess:2443/nodeworx)
In NodeWorx, navigate to Server > Firewall
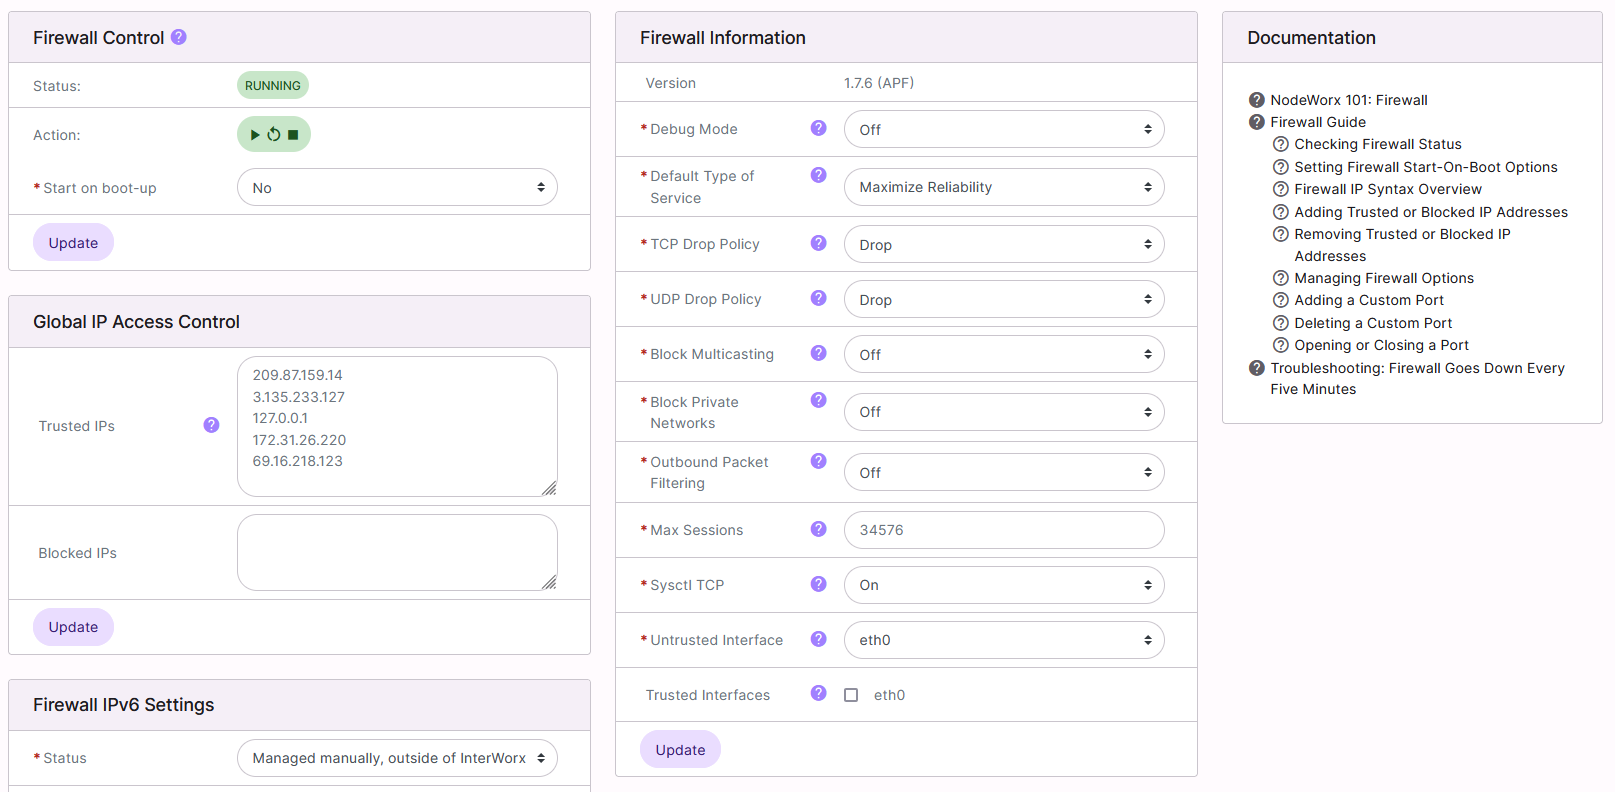
Under Firewall Control, the Status bar indicate the current status of the service
It is also possible to control the status of the service from this interface:
Play starts the service
Arrow restarts/refreshes the service
Stop stops the service
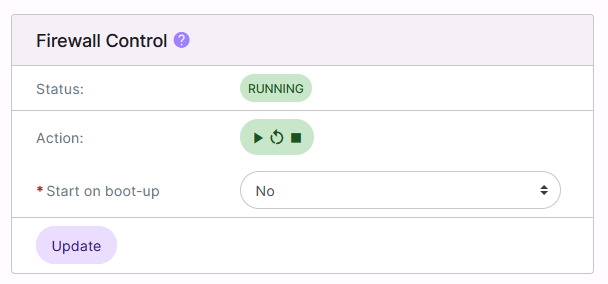
Setting Firewall Start-On-Boot Options
Log into NodeWorx from the browser (https://ip.ad.dr.ess:2443/nodeworx)
In NodeWorx, navigate to Server > Firewall
Under Firewall Control, select either Yes or No from the Start on Boot-up dropdown
Click Update
To Manage Trusted and Blocked IPs
It is possible to specify specific IPs to allow or block in the firewall. Unless specified, Trusted IPs will be allowed through the firewall across all ports, while Blocked IPs will be denied access across all ports. IPs not listed in either Trusted IPs or Blocked IPs will be subject to the per-port rules listed under Port Access.
Firewall IP Syntax Overview
Simple Syntax
The simplest syntax is just a single valid IP address. For example, 192.168.1.10 and 169.254.43.11 are valid entries
Masked IP addresses may also be used, which allow the ability to cover an entire range of IPs. For example, 10.0.1.0/24 and 192.0.0.0/8 are valid entries
Advanced Syntax
Advanced IP syntax not only provides control over the IP address, but also the protocol (UDP or TCP), flow direction
(inbound or outbound), and port. The advanced syntax is: protocol:flow:port:ip
Protocol: Either UDP or TCP. If the protocol is not provided, TCP is assumed
Flow: Either in or out. If protocol is provided, then flow is required. Otherwise flow is optional. If flow is not provided, “in” is assumed
s/d=port: A single port number. Specifying if the port is the source port (s=), where the packet originates from, or the destination port (d=), where the packet will end up is also required
s/d=ip: A valid IP address. Either the IP address alone, or an IP address and mask may be used. Specifying if the IP address is the source IP (s=), where the packet originates from, or the destination IP (d=), where the packet will end up is also required
Example:
To only allow access over port 22 from the IP address 123.45.67.890:
tcp:in:d=22:s=123.45.67.890
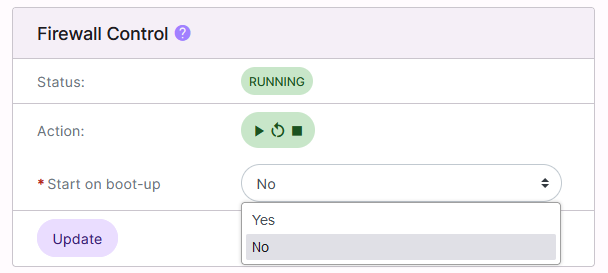
Adding Trusted or Blocked IP Addresses
Log into NodeWorx from the browser (https://ip.ad.dr.ess:2443/nodeworx)
In NodeWorx, navigate to Server > Firewall
Under Global IP Access Control, update the desired fields with one IP address, per line:
Trusted IPs: IPs that are trusted in the firewall
Note
The IP address for license.interworx.info (209.87.159.14) must always be listed in the Trusted IPs field for proper function of the InterWorx license authentication system.
Blocked IPs: IPs that are blocked in the firewall
Click Update
Removing Trusted or Blocked IP Addresses
Log into NodeWorx from the browser (https://ip.ad.dr.ess:2443/nodeworx)
In NodeWorx, navigate to Server > Firewall
Under Global IP Access Control, updated the desired fields by deleting the IP:
Trusted IPs: IPs that are trusted in the firewall
Note
The IP address for license.interworx.info (209.87.159.14) must always be listed in the Trusted IPs field for proper function of the InterWorx license authentication system.
Blocked IPs: IPs that are blocked in the firewall
Click Update
To Manage Firewall Options
Log into NodeWorx from the browser (https://ip.ad.dr.ess:2443/nodeworx)
In NodeWorx, navigate to Server > Firewall
Under Firewall Information, update the desired fields:
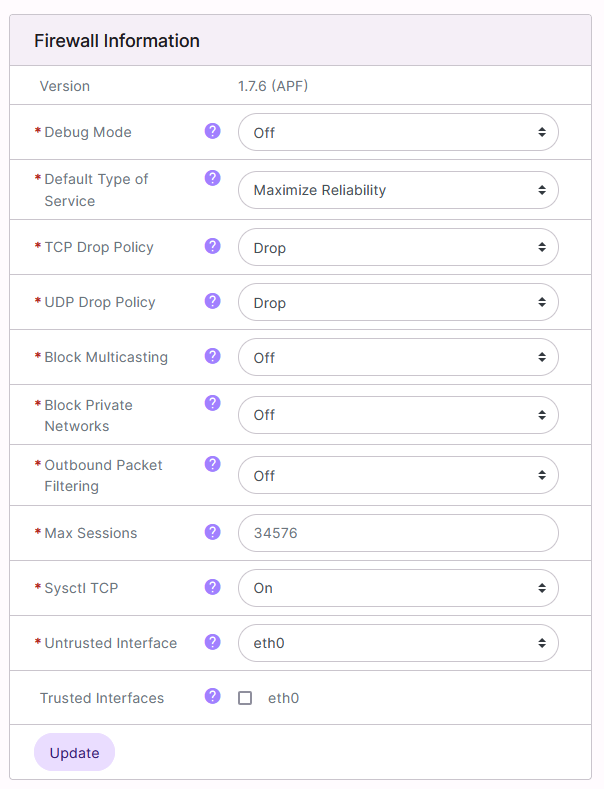
Firewall Debug Mode: When debug mode is On, all firewall rules are flushed every 5 minutes to prevent being locked out of the server due to a firewall misconfiguration. It is recommended to set this option to Off once the firewall is set up
Default Type of Service: This setting affects network response. There are three options:
Minimum delay: Should be selected when low latency (the time it takes for a data to travel from the source host to destination host) is most important
Maximum throughput: Should be selected when the volume of data transmitted in any period of time is important, and latency is less important
Maximum reliability: Should be selected when it is important that the data will arrive at the destination without retransmission being required
TCP Drop Policy: Determines how TCP packets are filtered. There are three options:
Reset: Sends a tcp-reset. This is the TCP/IP default
Drop: Drops the packet
Reject: Rejects the packet
UDP Drop Policy: Determines how UDP packets are filtered. There are three options:
Reset: Sends a tcp-reset. This is the TCP/IP default
Drop: Drops the packet
Reject: Rejects the packet
Prohibit: Sends an icmp-host-prohibited response.
Block Multicasting: Defines if the firewall should block multicast traffic
Block Private Networks: When set to On, this option blocks all private IPv4 addresses. If the server resides behind a firewall with NAT or routing scheme that otherwise uses private addressing, this option should be set to Off
Outbound Packet Filtering: Outbound (egress) filtering provides full outbound packet filtering. Port specific outbound rules will not apply if this setting is disabled
- Maximum Sessions: Defines the maximum number of connection tracking entries that can be handled by the firewall
simultaneously
Sysctl TCP: Enables or Disables sysctl hook changes to harden the kernel from certain network-based attacks, by lowering standard time-out values and other time based packet responses
Untrusted Interface: All traffic on defined interface will be subject to all firewall rules. This should be the internet exposed interface
Trusted Interfaces: All traffic on defined interface(s) will bypass all firewall rules
Click Update
To Manage Custom Port Access Rules
Adding a Custom Port
Log into NodeWorx from the browser (https://ip.ad.dr.ess:2443/nodeworx)
In NodeWorx, navigate to Server > Firewall
Under Port Access, click +. This opens the Add Port menu
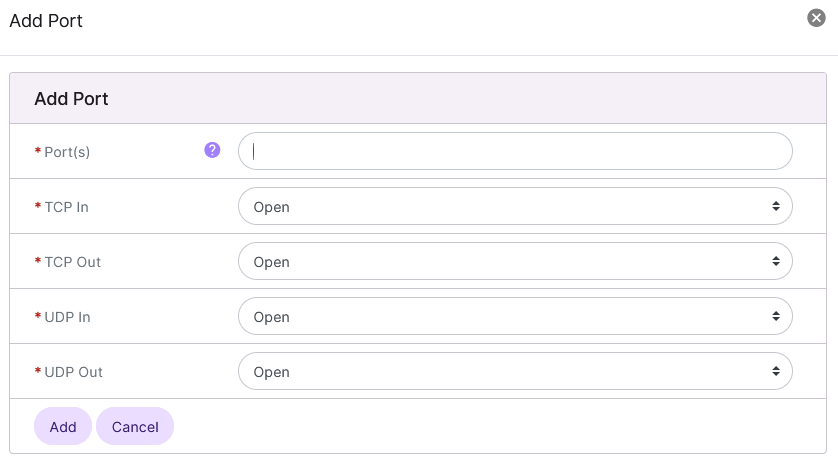
Update the required fields:
Port(s) field with the **desired port: The custom port
TCP and DUP In and Out dropdowns: Opens or closes the custom port
Click Add
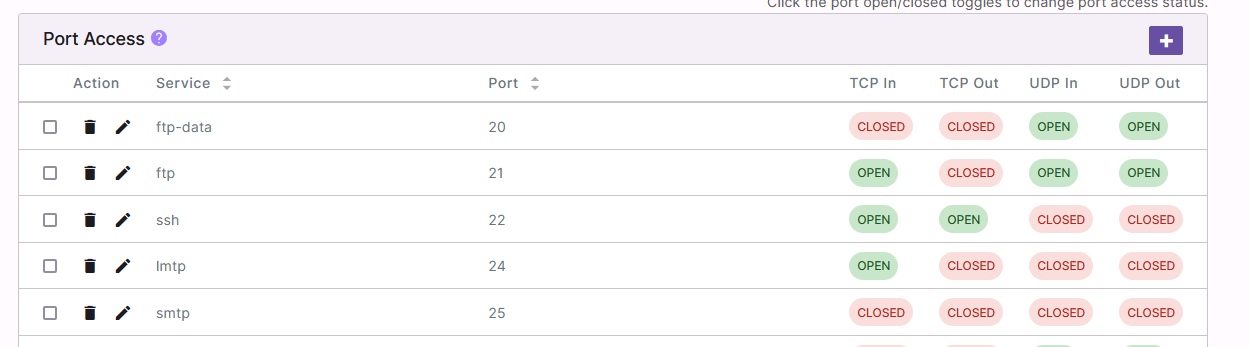
Opening or Closing a Port
Note
Note: Port 2443 must be open for the control panel to function correctly.
From the Port List
Log into NodeWorx from the browser (https://ip.ad.dr.ess:2443/nodeworx)
In NodeWorx, navigate to Server > Firewall
Under Port Access, click the Pencil next to the port. This opens the Update Port form
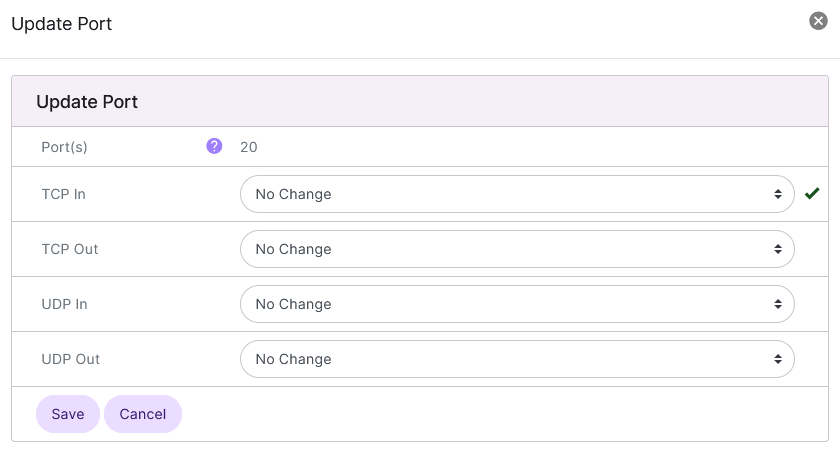
Select Open or Closed for each TCP and UDP dropdown
Click Save
Alternate Method From the Port List
Log into NodeWorx from the browser (https://ip.ad.dr.ess:2443/nodeworx)
In NodeWorx, navigate to Server > Firewall
Under Port Access, identify the port to edit
Click either Open or Closed under the corresponding TCP or UDP setting. If the setting is currently Closed, it will then be swiched to Open, and vice versa
From the With Selected Dropdown
Log into NodeWorx from the browser (https://ip.ad.dr.ess:2443/nodeworx)
In NodeWorx, navigate to Server > Firewall
Under Port Access, select the checkbox next to the port(s).
Selecting the checkbox next to the With Selected dropdown will automatically select all ports
Select Edit from the With Selected dropdown
Click Go. This opens the Update Port form
Select Open or Closed for each TCP and UDP dropdown
Click Save
Deleting a Custom Port
Note
The NodeWorx interface will always display a default list of commonly used ports. Deleting a commonly used port will not remove it from the table, but instead show the port as closed across all four options.
From the Port List
Log into NodeWorx from the browser (https://ip.ad.dr.ess:2443/nodeworx)
In NodeWorx, navigate to Server > Firewall
Under Port Access, click the Trashcan next to the port to be deleted. This opens the Confirm Deletion form
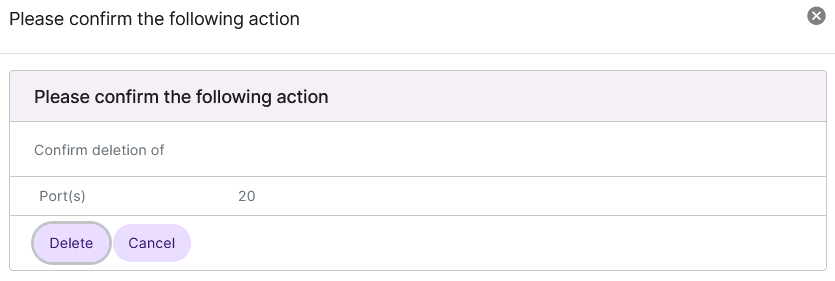
Click Delete
From the With Selected Dropdown
Log into NodeWorx from the browser (https://ip.ad.dr.ess:2443/nodeworx)
In NodeWorx, navigate to Server > Firewall
Under Port Access, select the checkbox next to the port(s).
Selecting the checkbox next to the With Selected dropdown will automatically select all ports
Select Delete from the With Selected dropdown
Click Go. This opens the Confirm Deletion form
Click Delete
Troubleshooting
APF Stops Every Five Minutes or Changes Do Not Persist
A common cause of APF stopping itself every five minutes, or changes not persisting, is that Development Mode is
enabled in /etc/apf/conf.apf.
Log in to the server at the CLI as root, either via SSH or from the terminal
At the CLI, check
/var/log/apf.logfor logging indicating Development Mode is enabled. Example:[root@server apf]# grep DEVEL /var/log/apf_log May 05 13:51:52 server apf(2693526): {glob} !!DEVELOPMENT MODE ENABLED!! - firewall will flush every 5 minutes. [root@server apf]#Note
The above logging occurs when starting or restarting APF while it is in Development Mode. If logs have rotated since the last time APF was started, the above message may not be in the current log files.
Checking the
DEVEL_MODEsetting in theconf.apffile, directly, is recommended.At the CLI, using a text editor, open
/etc/apf/conf.apf. The following example uses the Vim text editor:vim /etc/apf/conf.apf
Check the setting for
DEVEL_MODE# !!! Do not leave set to (1) !!! # When set to enabled; 5 minute cronjob is set to stop the firewall. Set # this off (0) when firewall is determined to be operating as desired. DEVEL_MODE="1"
If
DEVEL_MODEis set to1, edit the file to change the setting to0# !!! Do not leave set to (1) !!! # When set to enabled; 5 minute cronjob is set to stop the firewall. Set # this off (0) when firewall is determined to be operating as desired. DEVEL_MODE="0"
Save the file and exit the text editor
Restart APF
systemctl restart apf