Note
You are viewing the documentation for an older release of Interworx (8.0). To see documentation for the current generally available release of Interworx, click here: 8.2.
How To: Manage the IP Address of a SiteWorx Account
While the IP address of a SiteWorx account is assigned upon account creation, it is possible to change that IP after the fact, if desired.
Contents
To Access SiteWorx IP Management
Log into NodeWorx from the browser (https://ip.ad.dr.ess:2443/nodeworx)
In NodeWorx, navigate to SiteWorx > Accounts

Click the three vertical dots next to the SiteWorx account. This opens an options form
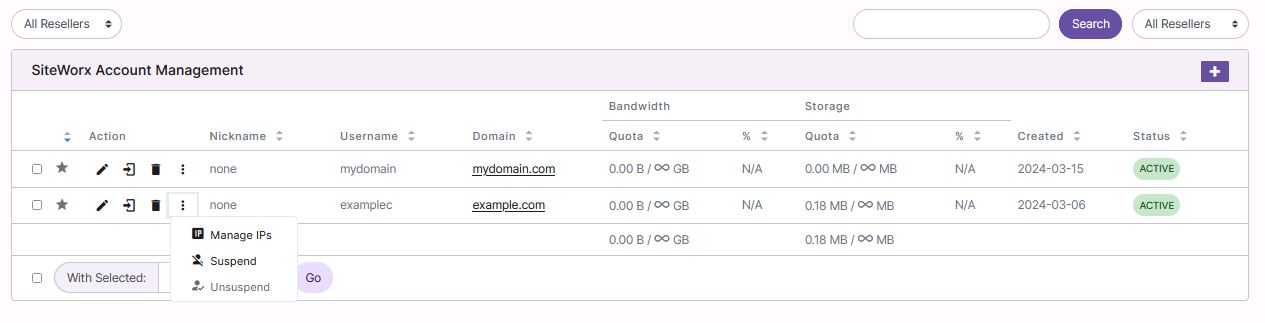
Select Manage IPs. This opens the Manage IPs page
To Add an IP Address to a SiteWorx Account
Log into NodeWorx from the browser (https://ip.ad.dr.ess:2443/nodeworx)
In NodeWorx, navigate to SiteWorx > Accounts
Click the three vertical dots next to the SiteWorx account. This opens an options form
Select Manage IPs. This opens the Manage IPs page
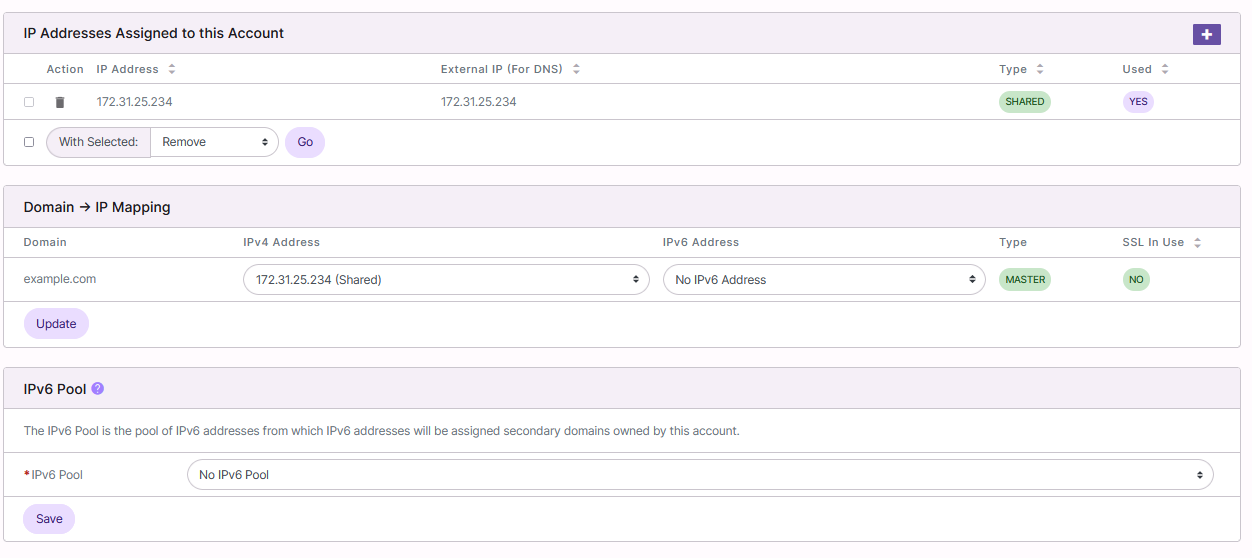
Click +. This opens the Add an IP Address from

Select the checkbox next to the IP
If there are are no IPs listed, see: IP Management Documentation
Click Save
To Change the IP Address of a SiteWorx Account
Log into NodeWorx from the browser (https://ip.ad.dr.ess:2443/nodeworx)
In NodeWorx, navigate to SiteWorx > Accounts
Click the three vertical dots next to the SiteWorx account. This opens an options form
Select Manage IPs. This opens the Manage IPs pagee
Under Domain -> IP Mapping, select the new IP from the dropdown

Click Update
To Change the IPv6 Pool of a SiteWorx Account
Log into NodeWorx from the browser (https://ip.ad.dr.ess:2443/nodeworx)
In NodeWorx, navigate to SiteWorx > Accounts
Click the three vertical dots next to the SiteWorx account. This opens an options form
Select Manage IPs. This opens the Manage IPs page
Under IPv6 Pool, select the IPv6 Pool from the IPv6 Pool dropdown

Click Save
To Remove an IP Address for a SiteWorx Account
Log into NodeWorx from the browser (https://ip.ad.dr.ess:2443/nodeworx)
In NodeWorx, navigate to SiteWorx > Accounts
Click the three vertical dots next to the SiteWorx account. This opens an options form
Select Manage IPs. This opens the Manage IPs page
Under IP Addresses Assigned to This Account, select the trashcan next to the IP address. This opens the Confirm Deletion form
Note
It is not possible to remove the IP address that is currently assigned to the SiteWorx Account. If that IP needs to be removed from the account, the SiteWorx account’s IP address must be changed to a different IP address, first.
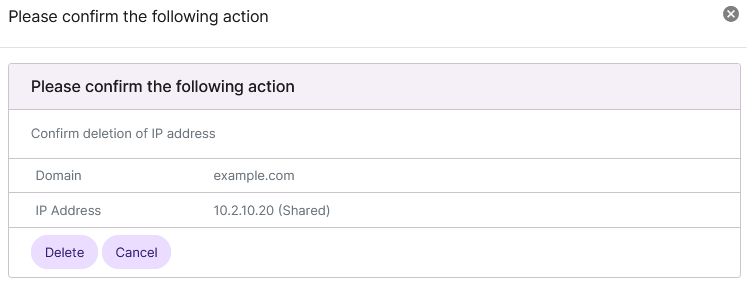
Click Delete