How To: Identify and Remove Spam
This is documentation on how to run Linux Malware Detect (or MalDet), use email headers to determine the source of spam, and clean the mail queue after the source of the spam has been removed.
Contents
Scanning for Malware
It is recommended to regularly use a malware scanner to detect any malicious scripts that could be used to send spam from the server.
Any malware scanner can be used for this process, however, Linux Malware Detector (or MalDet) is one that is highly recommended. Instructions on how to install and use MalDet can be found here.
Identifying Where Spam is Coming From
It may be possible to identify the user who is sending spam by examining the message headers in the mail queue, and
comparing the unix user ID (UID) of the sender to the UIDs listed in /etc/passwd.
Log into NodeWorx from the browser (https://ip.ad.dr.ess:2443/nodeworx)
In NodeWorx, navigate to System Services > Mail Server > Mail Queue
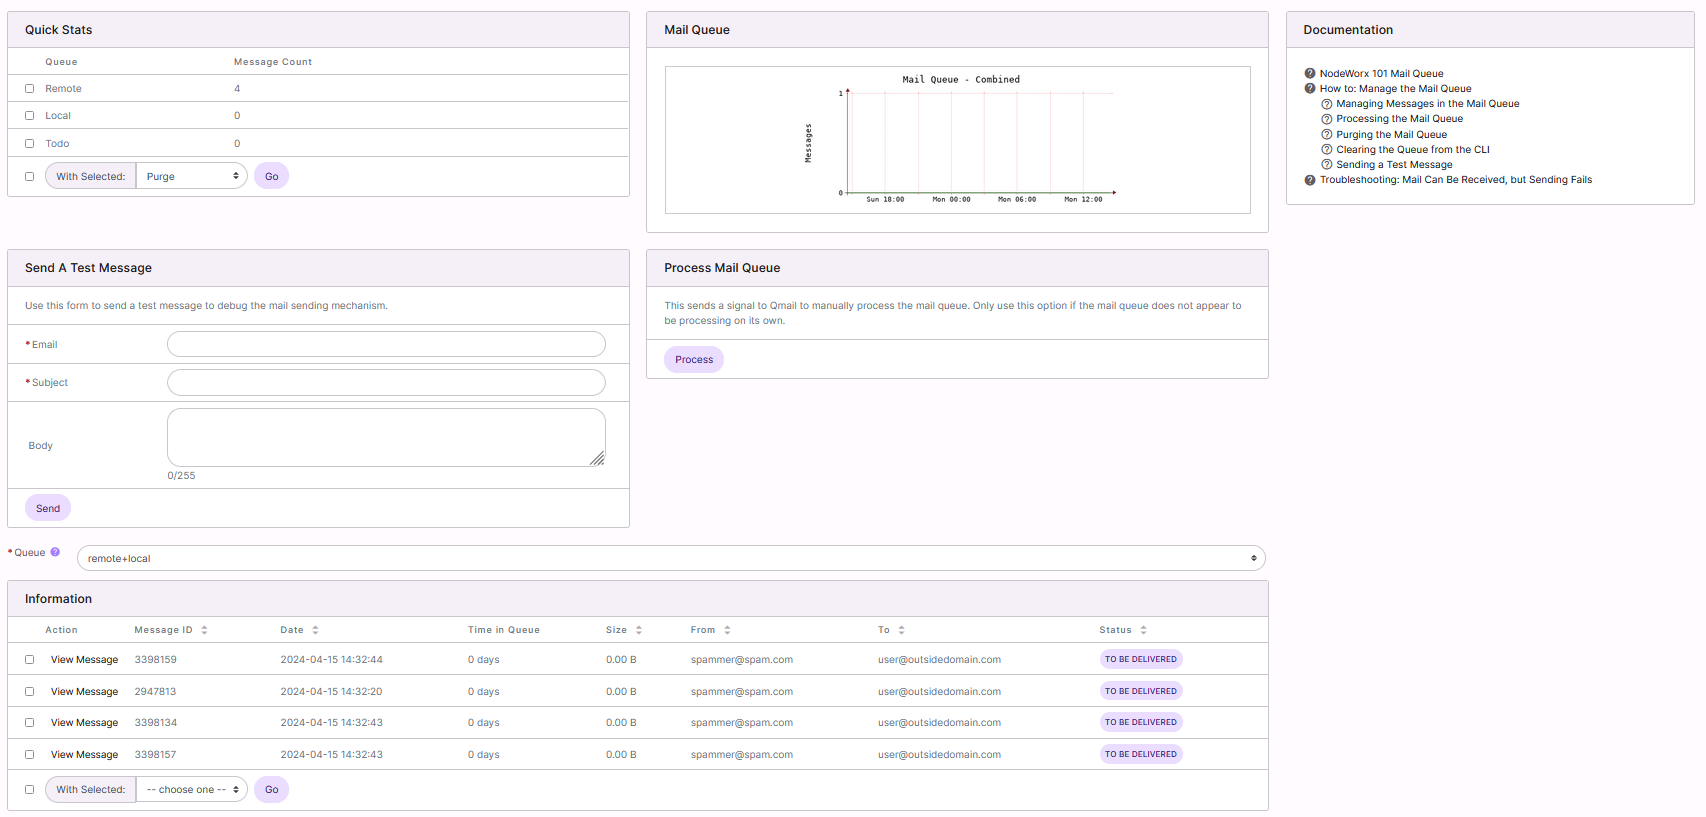
Under Information, click on View Message next to one of the spam messages. This will open a preview of the message, including the header

In the message header, look at the first line. This line shows the sender’s UID. In the below example, the sender has the UID of 1003
Note
If the UID is 108, that indicates the message is going through the vpopmail service, and the messages were sent from a customer’s local mail client (Outlook, Thunderbird, etc). Unfortunately, that may make it impossible to identify the sender, as that means the customer’s local box is compromised, not the SiteWorx account or server.
In this case, it is recommended to reach out to the customers on the server to have them run malware scanners on their computers, and change their email passwords.

Log in to the server at the CLI as root, either via SSH or from the terminal
Use
grepto search for the UID in/etc/passwd. In this example, the user is mydomain[root@server ~]$ grep 1003 /etc/passwd mydomain:x:1003:1003::/home/mydomain:/bin/bash [rootn@server ~]$
Use Maldet, or another malware scanner to remove any malware associated with that domain and inform the user that they must change their passwords and update any scripts, such as WordPress, immediately
Clearing the Mail Queue
There are two ways to clear existing spam from the mail queue–globally, which removes the entire mail queue, and selectively, which removes messages fitting a specific pattern.
To Globally Empty the Queue
Warning
Globally emptying the queue will delete all messages that are currently in the queue. This includes both spam and valid messages. As such, this method should be used with caution.
Log in to the server at the CLI as root, either via SSH or from the terminal
From the CLI, run the following command sequence. This sequence will:
Navigate to the qmail directory
Stop the SMTP service
Rename the queue directory to queue.bad
Reinstall qmail–this regenerates the queue directory
Restart the SMTP service
cd /var/qmail; service smtp stop; mv queue queue.bad; yum reinstall qmail -y; service smtp start
To Selectively Clear the Queue
Selectively clearing the queue uses a pattern, such as a source email address, to target messages for removal.
Log in to the server at the command line as root, either via SSH or from the terminal
From the CLI, run the following command sequence, replacing {PATTERN} with the source email address, or other pattern you would like to search for and remove from the queue. This sequence will:
Navigate to the qmail queue directory
Create a folder named “junk” for the spam messages to be moved to
Stop the SMTP service
Search for a specific pattern and move all messages matching that pattern to the junk folder
Restart the SMTP service
cd /var/qmail/queue/; mkdir junk; service smtp stop; /var/qmail/bin/qmail-remove -p "{PATTERN}" -y junk/ -r; service smtp start