How To: Manage DNS Zones and Records
From the DNS Zones page in NodeWorx, server administrators can add and edit DNS zones and records for the domains on the server.
Descriptions of the different types of DNS zones and their add and edit requirements can be found here.
Note
By default, this page is the only location where domain A records can be managed. A record editing can
be enabled for Siteworx accounts in ~iworx/iworx.ini. See To Enable A Record Management For SiteWorx.
To View the DNS Records for a Domain
Log into NodeWorx from the browser (https://ip.ad.dr.ess:2443/nodeworx)
In NodeWorx, navigate to System Services > DNS Server > Zones
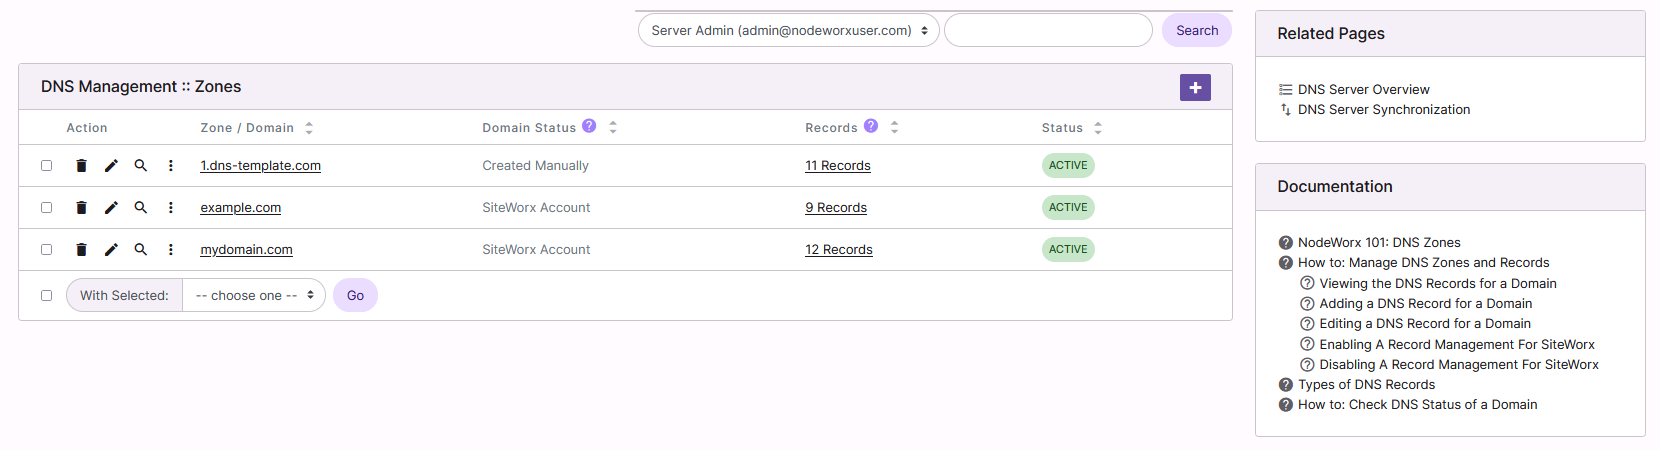
Click the Magnifying Glass next to the domain. This opens the specific DNS records page for that domain
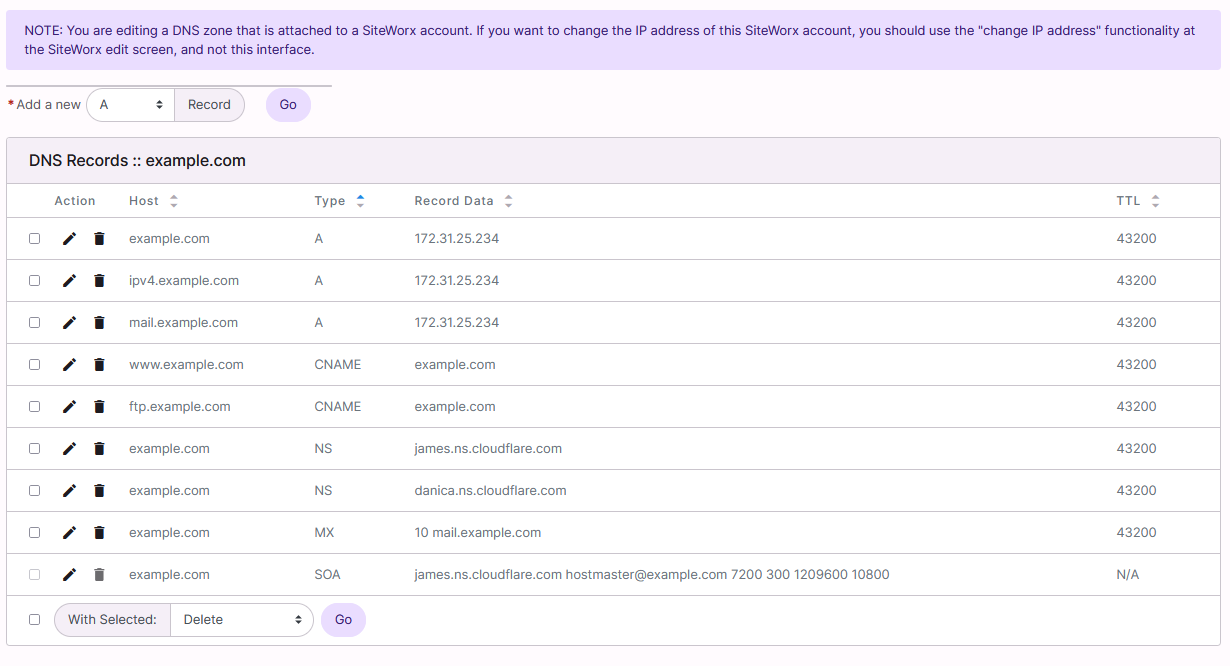
To Edit a DNS Records for a Domain
Log into NodeWorx from the browser (https://ip.ad.dr.ess:2443/nodeworx)
In NodeWorx, navigate to System Services > DNS Server > Zones
Click the Magnifying Glass next to the domain. This opens the specific DNS records page for that domain
Click the Pencil next to the record to edit. This opens the Edit DNS Record Form
Update the desired information
Click Save
To Add a DNS Record for a Domain
Log into NodeWorx from the browser (https://ip.ad.dr.ess:2443/nodeworx)
In NodeWorx, navigate to System Services > DNS Server > Zones
Click the Magnifying Glass next to the domain. This opens the specific DNS records page for that domain
From the Add a New dropdown, select the type of record
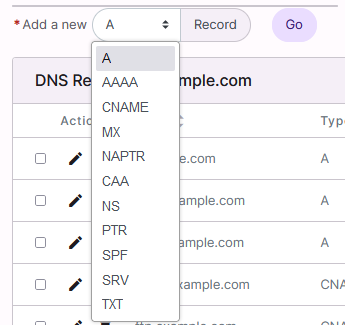
Click Go. This opens the Add DNS Record form. This form is a different for each type of record, as they all require different configuration information. Details can be found here
Update the required information
Click Save
To Add a DNS Zone
DNS zones for SiteWorx account domains are created automatically when a new account or domain is added. Manually creating a DNS zone is also possible. This may be useful if the zone for an existing SiteWorx account or domain was deleted from NodeWorx, or if hosting DNS for a domain that is not associated with a SiteWorx account.
Manually created DNS zones are created with the records listed in the Default DNS Template.
Log into NodeWorx from the browser (https://ip.ad.dr.ess:2443/nodeworx)
In NodeWorx, navigate to System Services > DNS Server > Zones
Click +. This opens the Add a DNS Zone form
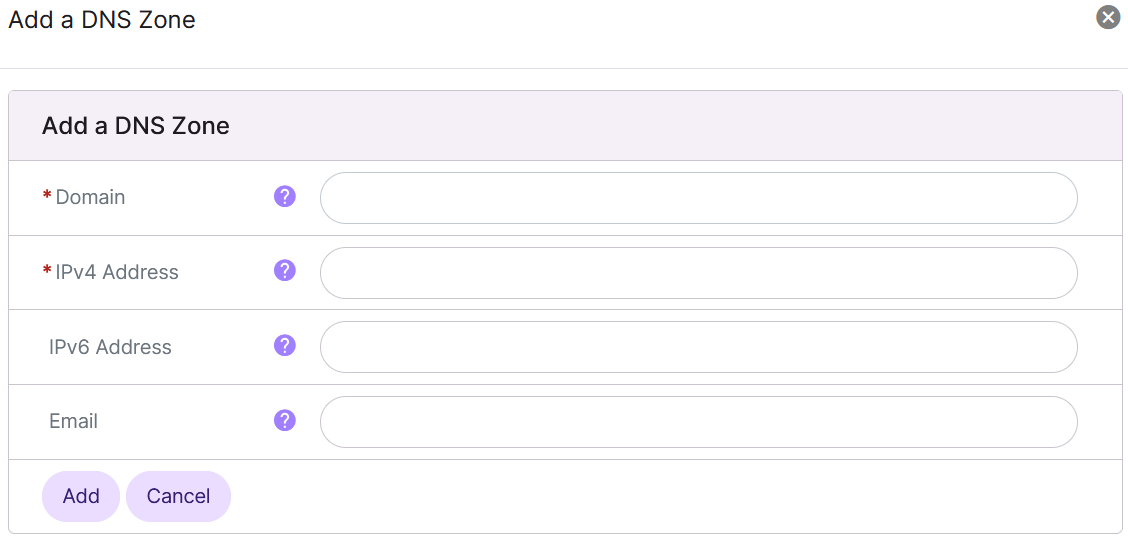
Update the desired fields:
Domain: The domain for the DNS zone. Do not include the ‘www’ prefix. The domain should be in the format: yourdomain.com. All top level domain (TLD) extensions are valid (i.e. yourdomain.co.uk)
IPv4 Address: IPv4 address to use for variable replacement in DNS Templates
IPv6 Address: IPv6 address to use for variable replacement in DNS Templates
Email: Email address to use for variable replacement in DNS Templates
Click Add
To Enable A Record Management For SiteWorx
Warning
This setting should be enabled with extreme caution, as it allows the potential for SiteWorx users to accidentally delete records that are required for their domains to be accessible from the browser.
Note
This is a global setting. It is not possible to enable access to edit A records per-account.
Log in to the server at the CLI as root, either via SSH or from the terminal
At the CLI, run the following. This will enable the SiteWorx A Record Control setting in
~iworx/iworx.ini:~iworx/bin/ini.pex --set --section dns --index siteworx_a_record_control --value 1
To Disable A Record Management For SiteWorx
Note
This is a global setting. It is not possible to disable access to edit A records per-account.
Log in to the server at the CLI as root, either via SSH or from the terminal
At the CLI, run the following. This will disable the SiteWorx A Record Control setting in
~iworx/iworx.ini:~iworx/bin/ini.pex --set --section dns --index siteworx_a_record_control --value 0