Note
You are viewing the documentation for an older release of Interworx (8.1). To see documentation for the current generally available release of Interworx, click here: 8.2.
How To: Backup and Restore a SiteWorx Account from SiteWorx
InterWorx allows SiteWorx users the ability to schedule, create, and manage their own account backups.
Note
In order for backup options to be accessible within SiteWorx, the SiteWorx account must be granted permission. This can be accomplished by editing the SiteWorx Account Management form for the account in NodeWorx, under SiteWorx > Accounts.
As enabling backup access for the SiteWorx account can only be performed by a system administrator, SiteWorx users who do not see Backups listed as an option in SiteWorx should contact their hosting provider.
Creating On-Demand SiteWorx Backups
SiteWorx users have the option of creating on-demand full, partial, and structure-only backups from the SiteWorx Interface.
To Create a Full Backup in SiteWorx
Full backups include all SiteWorx account related data.
Log into SiteWorx from the browser (https://ip.ad.dr.ess:2443/siteworx)
In SiteWorx, navigate to Backups > Backup Now, either from the side menu or SiteWorx home
From the Backup Type dropdown, select Full Backup
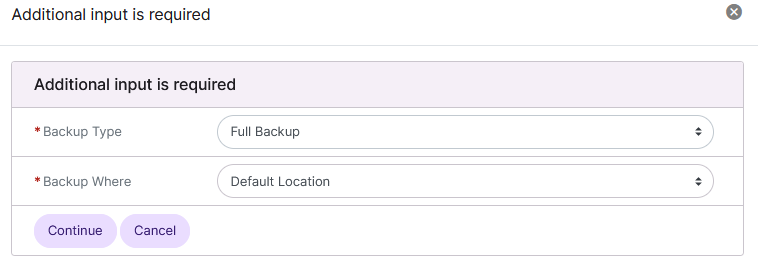
Select the location from the Backup Where dropdown
Note
In this example, the default location will be used. For more details regarding the other options, see SiteWorx Backup Locations.
Click Continue. This opens the Create Backup Package
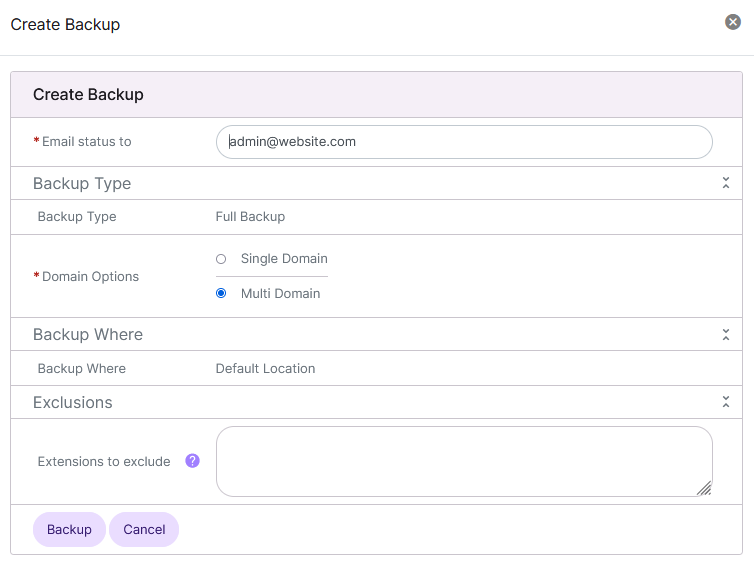
Update the required fields:
Email Status To: The email that should be notified when the backup process finishes
Domain Options: The domains that will be included in the backup
Single Domain: Create a single domain backup. No secondary domains will be backed up
Multi Domain: All domains will be backed up
Extensions to Exclude: (Optional) Type of file extensions to be excluded from the backup
Click Backup
To Create a Partial Backup in SiteWorx
Partial backups allow the ability to only back up specific portions of a SiteWorx account.
Log into SiteWorx from the browser (https://ip.ad.dr.ess:2443/siteworx)
In SiteWorx, navigate to Backups > Backup Now, either from the side menu or SiteWorx home
From the Backup Type dropdown, select Partial Backup
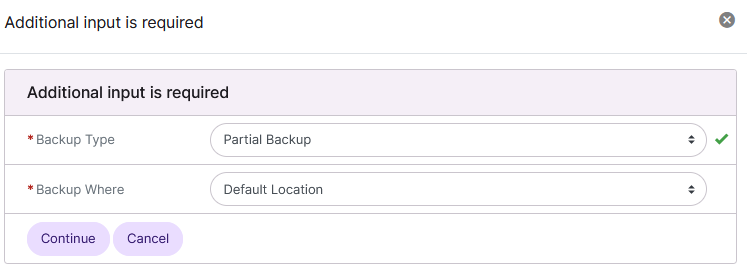
Select the location from the Backup Where dropdown
Note
In this example, the default location will be used. For more details regarding the other options, see SiteWorx Backup Locations.
Click Continue. This opens the Create Backup Package

Update the required fields:
Email Status To: The email that should be notified when the backup process finishes
What to Backup: What data will be included in the backup
Backup Your Website: Backs up website data
Backup Your Email: Backs up email mailboxes
Backup Your Database: Backs up database data
Extensions to Exclude: (Optional) Type of file extensions to be excluded from the backup
Click Backup
To Create a Structure-Only Backup in SiteWorx
Structure-Only backups only contain SiteWorx related data that is stored in the internal InterWorx database, such as email users and passwords.
Actual files, such as website files, actual emails, and database tables, are not included in structure-only backups
Structure-only backups are useful for SiteWorx accounts that have large amounts of data files, where a regular full backup could take a considerable amount of time and resources
Log into SiteWorx from the browser (https://ip.ad.dr.ess:2443/siteworx)
In SiteWorx, navigate to Backups > Backup Now, either from the side menu or SiteWorx home
From the Backup Type dropdown, select Structure-Only Backup
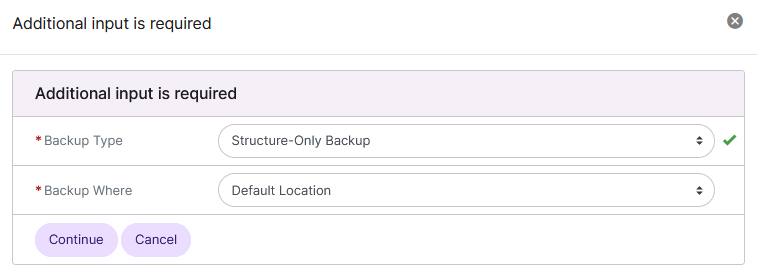
Select the location from the Backup Where dropdown
Note
In this example, the default location will be used. For more details regarding the other options, see SiteWorx Backup Locations.
Click Continue. This opens the Create Backup Package
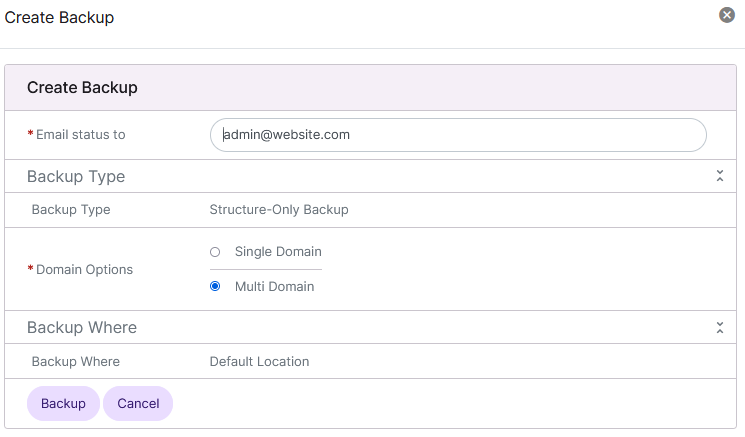
Update the required fields:
Email Status To: The email that should be notified when the backup process finishes
Domain Options: The domains that will be included in the backup
Single Domain: Create a single domain backup. No secondary domains will be backed up
Multi Domain: All domains will be backed up
Click Backup
Scheduling a SiteWorx Account Backup
SiteWorx users have the ability to schedule Daily, Weekly, and Monthly backups from the SiteWorx interface. These backups can be full, partial, or structure-only.
Note
By default, only Weekly and Monthly scheduled backups are available to SiteWorx users. Daily backups must be enabled by a system administrator in NodeWorx under Server > Settings.
SiteWorx users who do not see the Daily scheduled backups listed as an option in SiteWorx should contact their hosting provider to be granted access.
To Schedule Daily Backups
Log into SiteWorx from the browser (https://ip.ad.dr.ess:2443/siteworx)
In SiteWorx, navigate to Backups > Schedule, either from the side menu or SiteWorx home

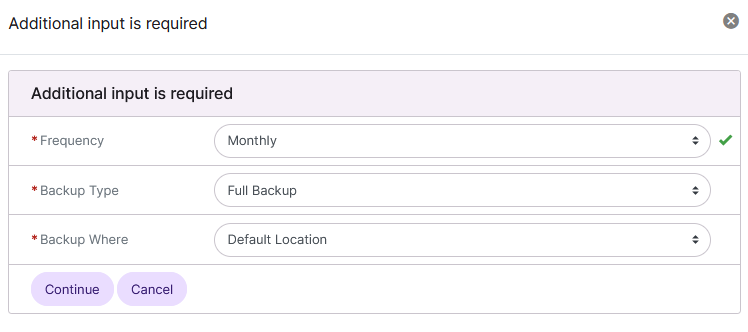
Click +. This opens the Create Scheduled Backups form
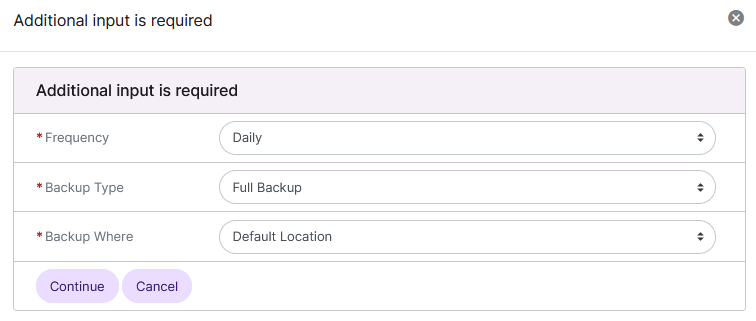
Select Daily from the Frequency dropdown
From the Backup Type dropdown, select the backup type
Note
In this example, a full backup will be used. For more details regarding the other options, see Creating On-Demand SiteWorx Backups.
Select the location from the Backup Where dropdown
Note
In this example, the default location will be used. For more details regarding the other options, see SiteWorx Backup Locations.
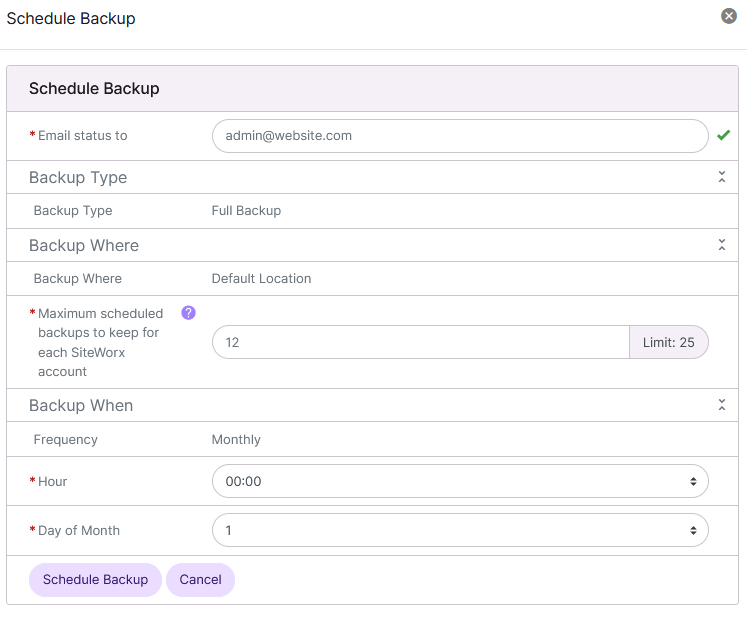
Click Continue. This opens the Schedule Backup form
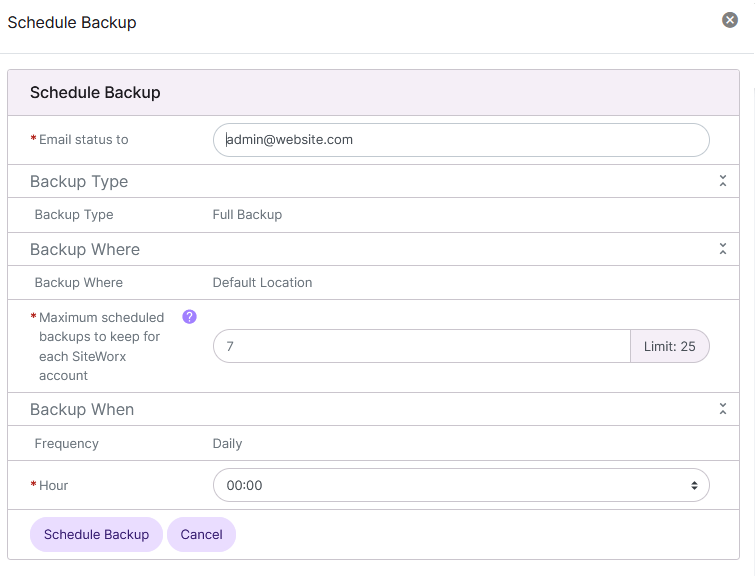
Update the required fields:
Email Status To: The email that should be notified when the backup process finishes
Maximum Scheduled Backups: Maximum number of backups kept before old ones are automatically removed
Hour: The hour of the day the backup process will automatically run, in 24 hour notation
Click Schedule Backup
To Schedule Weekly Backups
Log into SiteWorx from the browser (https://ip.ad.dr.ess:2443/siteworx)
In SiteWorx, navigate to Backups > Schedule, either from the side menu or SiteWorx home
Click +. This opens the Create Scheduled Backups form

Select Weekly from the Frequency dropdown
From the Backup Type dropdown, select the backup type
Note
In this example, a full backup will be used. For more details regarding the other options, see Creating On-Demand SiteWorx Backups.
Select the location from the Backup Where dropdown
Note
In this example, the default location will be used. For more details regarding the other options, see SiteWorx Backup Locations.
Click Continue. This opens the Schedule Backup form
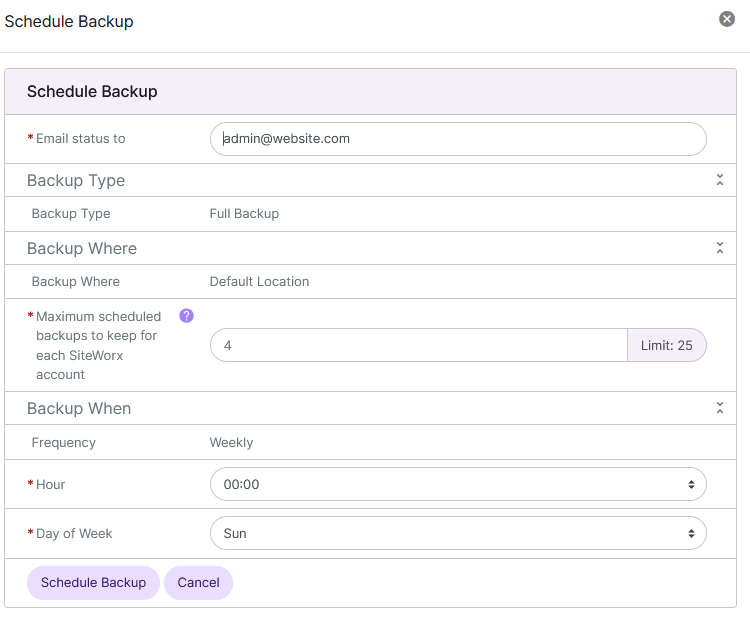
Update the required fields:
Email Status To: The email that should be notified when the backup process finishes
Maximum Scheduled Backups: Maximum number of backups kept before old ones are automatically removed
Hour: The hour of the day the backup process will automatically run, in 24 hour notation
Day of the Week: The day of the week the backup process will automatically run
Click Schedule Backup
To Schedule Monthly Backups
Log into SiteWorx from the browser (https://ip.ad.dr.ess:2443/siteworx)
In SiteWorx, navigate to Backups > Schedule, either from the side menu or SiteWorx home
Click +. This opens the Create Scheduled Backups form
Select Monthly from the Frequency dropdown
From the Backup Type dropdown, select the backup type
Note
In this example, a full backup will be used. For more details regarding the other options, see Creating On-Demand SiteWorx Backups.
Select the location from the Backup Where dropdown
Note
In this example, the default location will be used. For more details regarding the other options, see SiteWorx Backup Locations.
Click Continue. This opens the Schedule Backup form
Update the required fields:
Email Status To: The email that should be notified when the backup process finishes
Maximum Scheduled Backups: Maximum number of backups kept before old ones are automatically removed
Hour: The hour of the day the backup process will automatically run, in 24 hour notation
Day of the Month: The day of the month the backup process will automatically run
Click Schedule Backup
SiteWorx Backup Locations
While SiteWorx backups are sent to the user’s backup directory by default, it is also possible to transfer newly created backups to a remote server via FTP or SCP, or to a specific directory on the local server.
These options are available for both On-Demand and Scheduled backups.
Custom Local Directory
Select Local File from the Backup Where dropdown
Click Continue. This opens the Create Backup Package

Update the Backup Where field with the desired path
To Transfer to a Remote Server Over FTP
Select the FTP from the Backup Where dropdown
Click Continue. This opens the Create Backup Package

Under Backup Where, update the required fields:
Path: Path to the directory on the remote server the backup should be located
Username: FTP username
Password/Confirm Password: FTP password
Hostname: Hostname of the remote server
Port: FTP port
Passive Mode: Determines whether the FTP connection should be in Passive or Active mode
To Transfer to a Remote Server Over SCP
Select the SFTP/SCP from the Backup Where dropdown
Click Continue. This opens the Create Backup Package
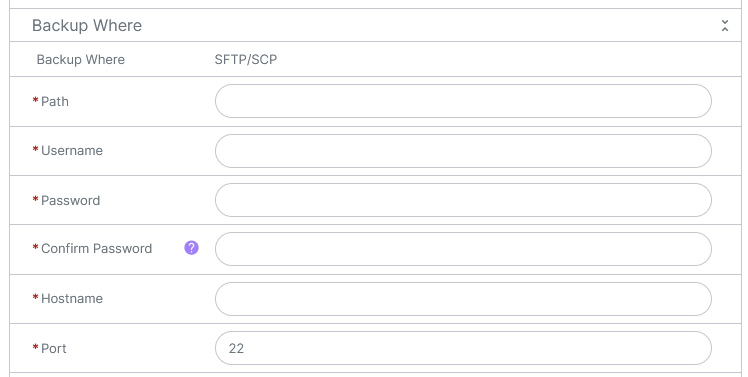
Under Backup Where, update the required fields:
Path: Path to the directory on the remote server the backup should be located
Username: SCP username
Password/Confirm Password: SCP user password
Hostname: Hostname of the remote server
Port: SCP port
Managing SiteWorx Backups
SiteWorx users may download and delete both On-Demand and Scheduled backups. They may also restore Partial backups.
To Download a SiteWorx Backup
Log into SiteWorx from the browser (https://ip.ad.dr.ess:2443/siteworx)
In SiteWorx, navigate to Backups > Management, either from the side menu or SiteWorx home
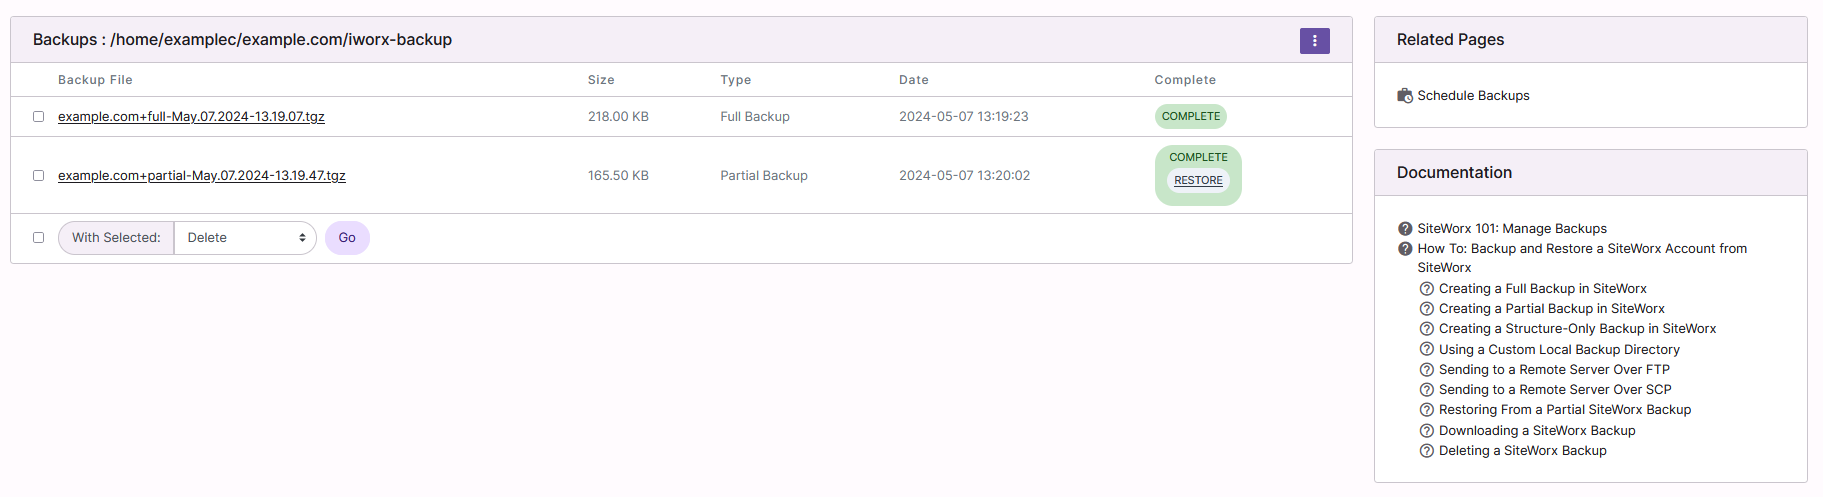
Click on the backup. In most browsers, this opens a window with options to save or open the file
Click Save
To Restore From a Partial SiteWorx Backup
Log into SiteWorx from the browser (https://ip.ad.dr.ess:2443/siteworx)
In SiteWorx, navigate to Backups > Management, either from the side menu or SiteWorx home
Click Restore next to the backup. This opens the Confirmation form
Warning
Restoring a SiteWorx partial backup file will overwrite existing data with the data stored in the backup file.

Click Restore
To Delete a SiteWorx Backup
Log into SiteWorx from the browser (https://ip.ad.dr.ess:2443/siteworx)
In SiteWorx, navigate to Backups > Management, either from the side menu or SiteWorx home
Select the checkbox next to the backup(s)
Selecting the checkbox next to the With Selected dropdown will automatically select all backups
Select Delete from the With Selected dropdown
Click Go. This opens the Confirmation form
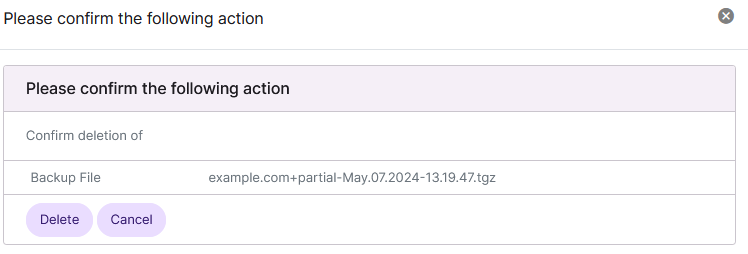
Click Delete