Note
You are viewing the documentation for a development version of Interworx (7.10). To see documentation for the current generally available release of Interworx, click here: 7.13.
Plugin Developer Guide
Introduction
Why Have Plugins?
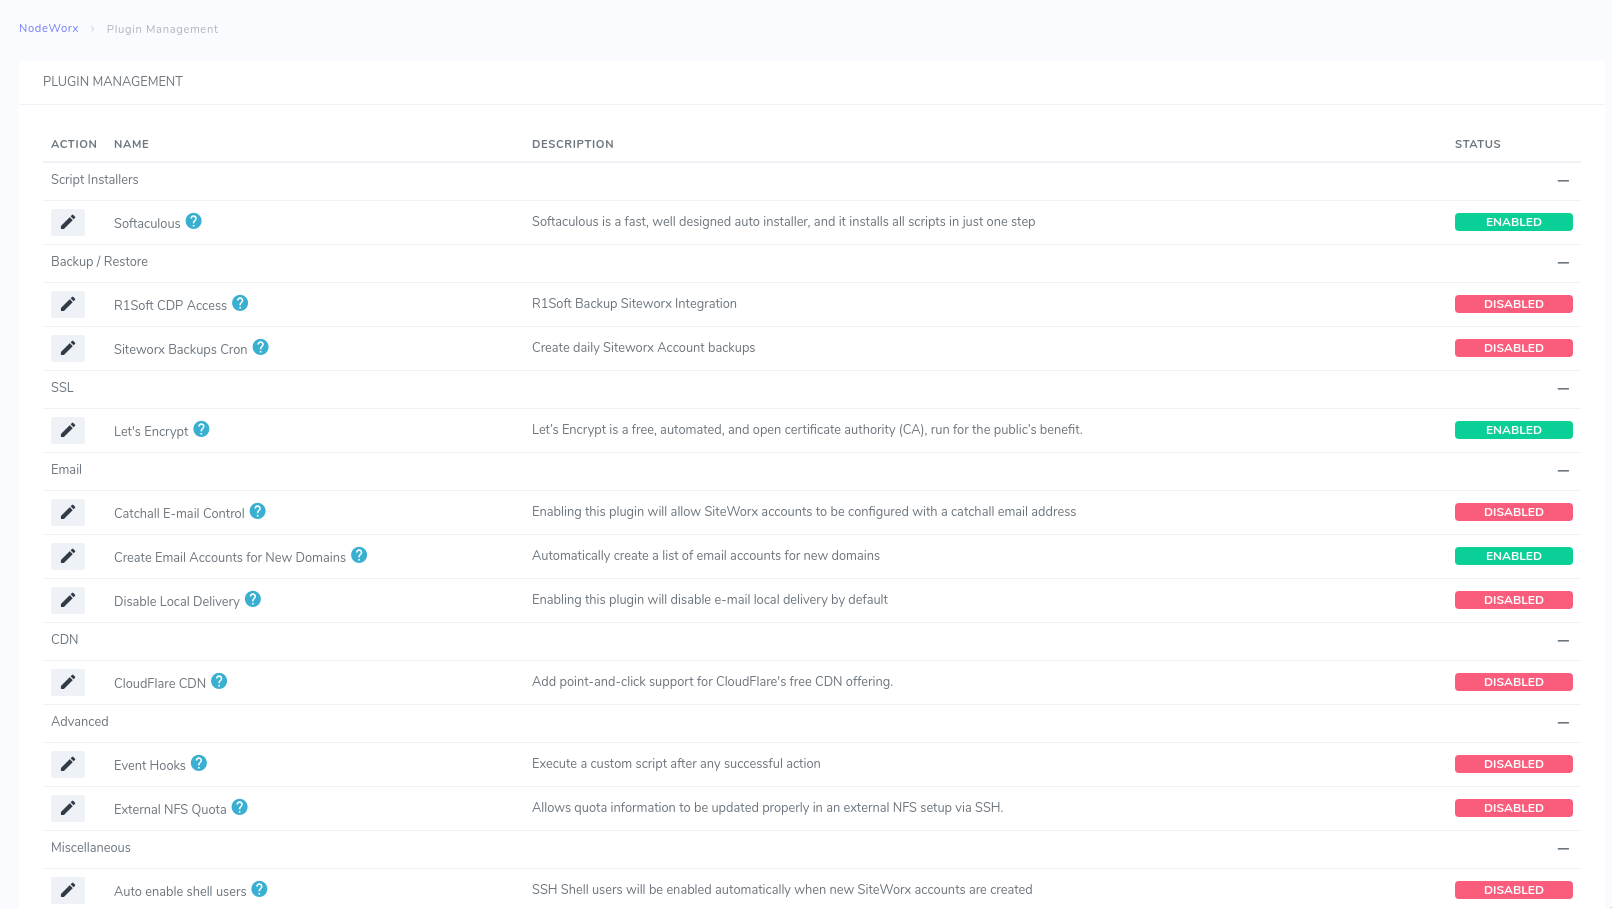
The Plugin Management page in NodeWorx
What Can Plugins Do?
Anything that can be scripted with the InterWorx API can be packaged into a plugin, which means nearly any action that can be performed within NodeWorx and SiteWorx can be performed using our plugin system. Plugins can modify existing behavior, add new features and behavior, or even disable existing behavior of the NodeWorx and/or SiteWorx control panel experience.
Getting the Lay of the Land
Basic Requirements
Plugin developers should have some experience with the PHP programming language and at a minimum a basic understanding of object-oriented programming.
NodeWorx vs SiteWorx
NodeWorx is the server level control panel interface, accessible via http://yourserver.tld:2443/nodeworx . It provides server-level controls for managing SiteWorx accounts, reseller accounts, system services, backups and restoring, and clustering, as well as system-level IP management, distribution, and much more.
SiteWorx is the website level control panel interface, accessible via http://yoursite.tld:2443/siteworx . It provides tools for maintaining domain-level users, IPs, e-mail accounts, MySQL databases, statistics analysis, backups, an interface for uploading and downloading files to and from your web space, among other services.
Controllers and Actions
A controller is a part of programming architecture that houses the actions for a particular segment of an application. The controller actions allow the user to modify the interface and output as needed. Each controller generally corresponds to a “page” in the control panel.
An action is a thing that can be performed. Some actions change things, some actions query data.
The default action for a controller is called the indexAction. This action is executed when the controller is loaded without any other actions being called. It is the action that generally displays the default content for the controller or page, if applicable.
- Commit actions are those that perform a measurable, concrete change to the system. As opposed to actions that simply query information or list data, commit actions are typically used to add, edit, or delete data records at a user’s request. Commit actions with forms require clear and concise function comments, with the following format:
/**
 * Enable Cloudflare for a subdomain.
 *
 * @param Form_SW_Cloudflare_Enable $Form
 */
public function enableCommitAction( Form_SW_Cloudflare_Enable $Form ) {
Plugins can hook into existing Controller Actions, or establish new Controllers and Actions.
Plugins can also take advantage of existing InterWorx actions.
Templates
Files and Directory Structure
- Required FilesThe required files for a proper plugin structure are few, but each is key to the proper functioning of the plugin:
- Plugin Directory: ~iworx/plugins/[plugin-name]This is the directory where all files relevant to the plugin are stored. Here, ’plugin-name’ should be short, hyphen separated (no spaces or underscores), and lowercase.
- Plugin INI file: ~iworx/plugins/[plugin-name]/plugin.iniThe plugin INI contains plugin metadata, such as the version, author, and a brief description.
- Plugin Class file: ~iworx/plugins/[plugin-name]/Plugin/[PluginName].phpThis is the core of the plugin and contains the majority of its functionality, such as data storage, InterWorx menu updates, and enabling/disabling of the plugin. ’PluginName.php’ should reflect the naming of ’plugin-name’ above, with hyphens removed and each word capitalized.
- Optional FilesThe following files are optional to the core operation of a plugin, but allow users to further personalize their plugin interface:
- Plugin NodeWorx Controller file: ~iworx/plugins/[plugin-name]/Ctrl/Nodeworx/[PluginUrl].phpWith this file present, a user will be able to control how the plugin is represented in the NodeWorx interface (if necessary). The naming of this file determines the URL of the controller in this case we’d find it at /nodeworx/plugin/url.
- Plugin SiteWorx Controller file: ~iworx/plugins/[plugin-name]/Ctrl/Siteworx/[PluginUrl].phpMuch like above, this file allows for control of the plugin with regards to the SiteWorx interface. The naming of this file determines the URL of the controller in this case we’d find it at /siteworx/plugin/url.
- Plugin default template file: ~iworx/plugins/[plugin-name]/templates/default.tplThe core template file, this file controls the layout and presentation of the plugin’s output in-browser.
Other files can be included as necessary, such as those for input forms, images, payloads, formatters, custom libraries, and data sources. These are more advanced features and described in detail later on.
Your First InterWorx Plugin
- Plugin Class file: ~iworx/plugins/hello/Plugin/Hello.phpThis file is the plugin core. The majority of functionality and configuration of the plugin is here, and can be modified to suit a variety of needs. [see below]
/**
 * Hello World plugin.
 *
 * @package    InterWorx
 * @subpackage Plugin
 */
class Plugin_Hello extends Plugin {
  /**
   * Init the plugin, disabling if necessary.
   */
  protected function _init() {
    /*
     * You can conditionally disable the plugin
     */
    //$this->_disable( 'reason for disabling goes here, will go in iworx.log' );

    /*
     * You can set plugin variables as needed like this
     */
    //$this->_setVar( 'myvariable', 'somevalue' );

    /*
     * And retrieve them later like this
     */
    //$this->getVar( 'myvariable' );

    /*
     * You can set mixed datastore variables as needed like this
     */
    //$this->setDatastoreVar( 'storedvar', array( 1, 2, 3 ) );

    /*
     * And retrieve it later like this
     */
    //$this->getDatastoreVar( 'storedvar' );
  }

  /**
   * Customizations to siteworx menu can be done here.
   *
   * @param IWorxMenuManager $MenuMan
   */
  public function updateSiteworxMenu( IWorxMenuManager $MenuMan ) {
    $new_data = array( 'text'   => 'Hello World',
                       'url'    => '/siteworx/hello/world',
                       'class'  => 'iw-i-star' );

    $MenuMan->addMenuItemAfter( 'iw-menu-home', 'hello', $new_data );
    // also updateMenuItem( $id, $data )
    //      removeMenuItem( $id )
  }

  /**
   * Customizations to siteworx menu can be done here.
   *
   * @param IWorxMenuManager $MenuMan
   */
  public function updateNodeworxMenu( IWorxMenuManager $MenuMan ) {
    $new_data = array( 'text'   => 'Hello World',
                       'url'    => '/nodeworx/hello/world',
                       'class'  => 'iw-i-star' );
    $MenuMan->addMenuItemAfter( 'iw-menu-home', 'hello', $new_data );
    // also updateMenuItem( $id, $data )
    //      removeMenuItem( $id )
  }
}
- ~iworx/plugins/hello/Ctrl/Nodeworx/HelloWorld.phpSince we updated the NodeWorx menu to include our new plugin (line 62), we should define a controller for it. Assigning the title below (line 12) will allow us to specify the title header in-browser. [see below]
/**
 * Nodeworx hello world sample plugin controller.
 *
 * @package    InterWorx
 * @subpackage Plugin
 */
class Ctrl_Nodeworx_HelloWorld extends Ctrl_Nodeworx_Plugin {
  /**
   * Default action.
   */
  public function indexAction() {
    $this->getView()->assign( 'title', 'Hello World Sample Plugin, nodeworx' );
  }
}
- ~iworx/plugins/hello/Ctrl/Siteworx/HelloWorld.phpSame as above, we’ve included the plugin on the SiteWorx menu, so we should define a controller and set the title (line 12). [see below]
/**
 * Siteworx hello world sample plugin controller.
 *
 * @package    InterWorx
 * @subpackage Plugin
 */
class Ctrl_Siteworx_HelloWorld extends Ctrl_Siteworx_Plugin {
  /**
   * Default action.
   */
  public function indexAction() {
    $this->getView()->assign( 'title', 'Hello World Sample Plugin, siteworx' );
  }
}
- ~iworx/plugins/hello/plugin.iniThe plugin INI is where the plugin metadata is stored, much of which is displayed in NodeWorx > Plugin Management. [see below]
[plugin]
name="Hello World"
description="Hello World Sample InterWorx Plugin"
details="This plugin adds a 'Hello World' menu item to the top of BOTH NodeWorx and SiteWorx."
version="1.0"
author="interworx"
- ~iworx/plugins/hello/templates/default.tplThe template for this plugin isn’t too complicated just some text to display on the page. Templates ordinarily are where forms and payloads would be included. [see below]
Hello, world!
Plugin Advanced Feature Overview
These advanced features are discussed briefly here, and the case studies below demonstrate specific usage examples.
Form System
InterWorx’s form system is the ideal means to collect data from user input, and is composed of several parts:
- FormsMuch like controllers, forms are container elements that hold the various input objects that comprise a submittable form.
- InputsInputs come in many varieties, and can represent nearly any sort of user-provided data. Basic types include strings, integers, and selects. They can also be extended to handle specific formats to suit any need.
- ValidatorsValidators are objects that can be assigned to inputs and are useful for validating input coming in via forms.
- DatasourcesDatasources are objects that define what values are invalid for a given input (for example, with a select, checkbox, or radio input).

Form System Interface Elements
Payload System
Payloads are an integral part of how information is displayed within InterWorx. Payloads allow developers to easily present and update data dynamically in a wide variety of contexts. To accomplish this, each payload typically includes several key components:
- Payload Factory ClassesThe primary payload object, payload factory classes allow the various types of payloads ( Payload_Factory_NW_Dns or Payload_Factory_SW_Users, for example) to be instantiated as needed.
- Payload Data FormatsThe data to be displayed is called the Payload Data, and is a numerically-indexed array of similarly defined stdClass objects.
- Payload FormattingPayload Formatters allow various aspects of a payload columns, cells, headers to be formatted by a configurable set of rules. These are only relevant in the web interface.
- Payload ActionsBy providing an array of controller actions and various format parameters, payloads can optionally execute actions on the displayed data.
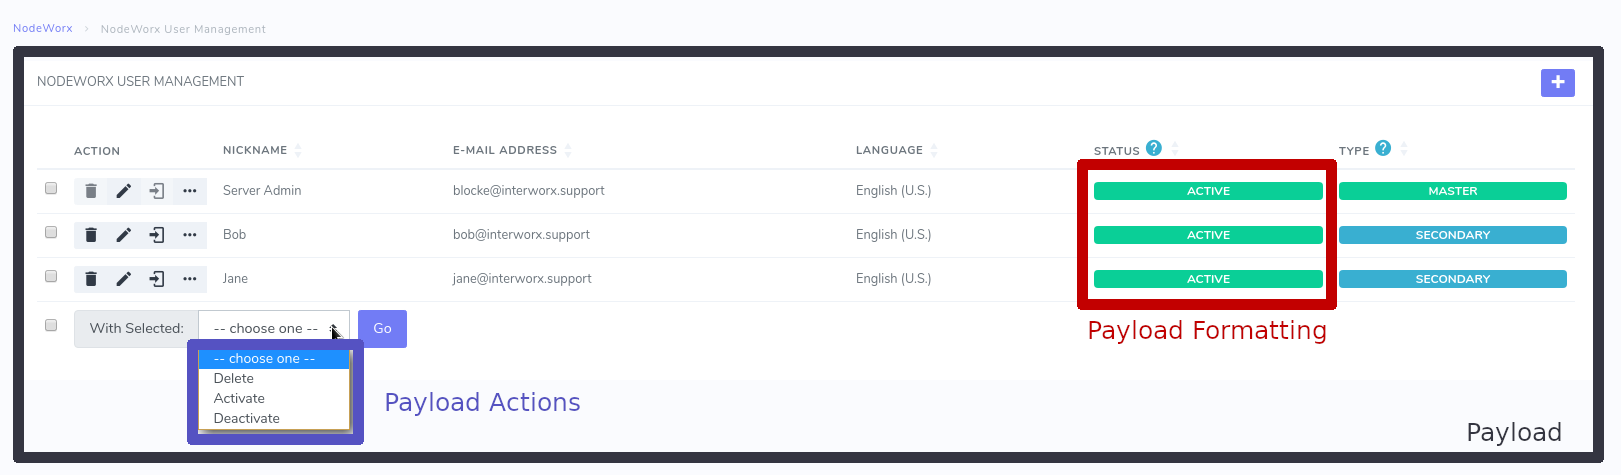
Payload System Interface Elements
Switching Users
For certain user operations, it is advantageous to execute an action as that user (instead of the default iworx user). In such a case the ~iworx/bin/runasuser.pex can be called with parameters for the user’s Unix name and the script or program to be called.
Case Studies
As mentioned previously, only a small subset of files are actually necessary for the most basic of plugins. As more in-depth functionality is needed, however, more files may be required. The following programs contain examples of how additional utility can be achieved with the InterWorx plugin system.
Plugin Case Study: auto-enable-shell-account
Auto Enable Shell Account is a plugin designed to activate shell account access for all new SiteWorx users added to an account. To accomplish this, it needs to perform only a small handful of tasks, but far more than we’ve seen thus far.
The first new function encountered here is initializeMyEditForm() (line 18). This optional function allows us to define settings that will be configurable via the plugin menu in NodeWorx > Plugin Management. It takes a form object as input, Form_NW_Plugins_Edit. At the start of the function a new form group is added (line 19), and datastore variables within the plugin (lines 20 and 22) are accessed (they are stored in the expected fashion, seen below). [see below]
/**
 * Plugin to auto-enable ssh shell users on account creation.
 *
 * @package    InterWorx
 * @subpackage Plugin
 */
class Plugin_AutoEnableShellAccount extends Plugin {
  /**
   * Init my edit form.
   *
   * Add plugin settings that specify which resellers this feature is enabled
   * for.
   *
   * @param Form_NW_Plugins_Edit $Form
   */
  public function initializeMyEditForm( Form_NW_Plugins_Edit $Form ) {
    $Group = $Form->addGroup( 'extra_options', 'Extra Plugin Settings' );
    $all_resellers = $this->getDatastoreVar( 'all_resellers' );
    $Group->addInput( new Input_Flag( 'all_resellers', $all_resellers ) );
    $resellers = $this->getDatastoreVar( 'resellers' );
    if( $resellers === '' ) {
      $resellers = array();
    }
    $Group->addInput( new Input_Select( 'resellers', $resellers ) )
      ->setDataSource( new DataSource_NW_ResellerIds() )
      ->setRequired( true )
      ->setMultipleAllowed( true );
  }
The next function processes the edit form we just initialized the aptly-named processMyEditForm() (line 8). Taking the same form as input, we use this space to handle the data submitted in the previous step, optionally storing it with setDatastoreVar() (lines 14 and 15). [see below]
/**
 * Process my edit form.
 *
 * @param Form_NW_Plugins_Edit $Form
 */
public function processMyEditForm( Form_NW_Plugins_Edit $Form ) {
  if( $Form->getValue( 'all_resellers' ) ) {
    $resellers = array();
  } else {
    $resellers = $Form->getValue( 'resellers' );
  }
  $this->setDatastoreVar( 'all_resellers', $Form->getValue( 'all_resellers' ) );
  $this->setDatastoreVar( 'resellers', $resellers );
}
Next, we simply set the priority of the plugin. Plugin priority determines the order in which plugins are initialized in the system. [see below]
/**
 * Get priority.
 *
 * @return integer
 */
public function getPriority() {
  return 40;
}
Lastly, we have the postAction(), where the majority of the plugin functionality resides. It accepts inputs that include the Controller, Action, and Form, and proceeds to use routeFromPHP() (lines 37 and 40) to call the NodeWorx Shell controller, which then enables the recently-added SiteWorx user (line 46). [see below]
/**
 * Handle the controller:action we care about.
 *
 * @param string        $ctrl_act
 * @param Ctrl_Abstract $Ctrl
 * @param string        $action
 * @param mixed         $params
 */
public function postAction( $ctrl_act, Ctrl_Abstract $Ctrl, $action, $params ) {
  if( $ctrl_act !== 'Ctrl_Nodeworx_Siteworx:addCommit' ) {
    return;
  }
  if( !$Ctrl->isViewSuccess() ) {
    return;
  }
  if( $this->_userHasNoAccess() ) {
    return;
  }
  assert( $params instanceof Form );
  /**
   * @var Form.
   */
  $Form     = $params;
  $uniqname = $Form->getValue( 'uniqname' );
  $password = $Form->getValue( 'password' );
  $ctrl = 'Ctrl_Nodeworx_Shell';
  if( IW::NW()->isReseller() ) {
    $NW = new NodeWorx( NodeWorx::MASTER_ID );
  } else {
    $NW = IW::NW();
  }
  $action = 'changeshell';
  $input = array( 'shell' => Ini::get( Ini::SHELL, 'default' ),
                  'users' => array( $uniqname ) );
  $Reply = IW::FC()->routeFromPHP( $ctrl, $action, $input, $NW );
  $action = 'enable';
  $input = array( 'users' => array( $uniqname ) );
  $Reply = IW::FC()->routeFromPHP( $ctrl, $action, $input, $NW );
  $sshConfig = SSHD::readConfig();
  if( count( $sshConfig['allowusers'] ) > 0 ) {
    $SSH       = new SSHD();
    $allowed   = $sshConfig['allowusers'];
    $allowed[] = $uniqname;
    $SSH->setAllowUsers( $allowed );
    $SSH->writeConfig();
  }
  if( $Reply->wasSuccessful() === true ) {
    $msg = 'Shell account user enabled';
  } else {
    $msg = "Tried to enable shell user {$uniqname}, but failed.";
  }
  $Ctrl->getView()->addMessage( $msg );
}
Plugin Case Study: CloudFlare
The InterWorx CloudFlare plugin allows for full support of CloudFlare’s CDN technology from within SiteWorx. As one of the larger plugins, it is a prime example of how easily the core plugin functionality can be extended.
The CloudFlare SiteWorx controller contains two prime examples of previously mentioned commit actions (lines 8 and 25). Both actions take very similar forms as input and call similar private functions (lines 12 and 29), defined elsewhere. [see below]
/**
 * Enable Cloudflare for a subdomain.
 *
 * @param Form_SW_Cloudflare_Enable $Form
 */
public function enableCommitAction( Form_SW_Cloudflare_Enable $Form ) {
  $parent    = $Form->getValue( 'parent' );
  $subdomain = $Form->getValue( 'subdomain' );
  $errors = array();
  $this->_enableSubdomain( $subdomain, $parent, $errors );
  if( empty( $errors ) ) {
    $this->_getPlugin()->setDomainStatusData( $subdomain, '1' );
    $this->_displaySuccess( 'index', 'CloudFlare Enabled on ' . $subdomain );
  } else {
    $this->_displayFailure( 'index', $errors );
  }
}

/**
 * Disable Cloudflare for a subdomain.
 *    * @param Form_SW_Cloudflare_Disable $Form
 */
public function disableCommitAction( Form_SW_Cloudflare_Disable $Form ) {
  $parent    = $Form->getValue( 'parent' );
  $subdomain = $Form->getValue( 'subdomain' );
  $errors = array();
  $this->_disableSubdomain( $subdomain, $parent, $errors );
  if( empty( $errors ) ) {
    $this->_getPlugin()->setDomainStatusData( $subdomain, '0' );
    $this->_displaySuccess( 'index', 'CloudFlare Disabled on ' . $subdomain );
  } else {
    $this->_displayFailure( 'index', $errors );
  }
}
Looking at that first form, we can see that building a basic input form isn’t complicated. [see below]
/**
 * Form_SW_Cloudflare_Enable class.
 *
 * @package    InterWorx
 * @subpackage Form
 *
 */
class Form_SW_Cloudflare_Enable extends Form {
  /**
   * GetInputForm function.
   */
  public function initInputForm() {
    $Form = new Form_Input();
    $Form->addInput( new Input_String( 'parent' ) );
    $parent = $Form->getValue( 'parent' );
    $DS = new DataSource_Subdomains( $parent );
    $Form->addInput( new Input_Select( 'subdomain' ) )
      ->setDataSource( $DS );
    $this->setInputForm( $Form );
  }

  /**
   * Initialize.
   */
  protected function _initialize() {
    parent::_initialize( 'enable_cloudflare_domain' );
    $this->addInput( $this->getInput( 'subdomain' )->getDisabledCopy() );
  }
}
After the form is instantiated, the subdomain input is added using DataSource_Subdomains() (line 18), described below. Shown here, it can be seen that the datasource simply consists of a subset of CNAME DNS records, passed to the constructor as an array of subdomain names (line 28). [see below]
/**
 * DataSource for CloudFlare subdomains.
 *  * @package    InterWorx
 * @subpackage Input
 */
class DataSource_Subdomains extends DataSource_Array {
  /**
   * Constructor.
   *
   * @param string $parent
   */
  public function __construct( $parent ) {
    $subdomains = array();
    $dns = IW::SW()->getSimpleDnsRecordsFor( $parent );
    foreach( $dns as $record ) {
      if( preg_match( '/^ftp\.*/', $record['host'] ) ) {
        continue;
      }
      if( preg_match( '/^cloudflare-resolve-to\.*/', $record['host'] ) ) {
        continue;
      }
      if( $record['type'] === Dns_Record::CNAME ) {
        $subdomains[] = $record['host'];
      }
    }
    parent::__construct( $subdomains );
  }
}
Building a payload, while one of the more complicated objects, is still straightforward. Columns are added to the payload by creating new Payload_Columns (lines 25, 26, 31 and 32), and have a considerable number of functions for configuration ( setName, setOrderBy, etc ). [see below]
/**
 * Factory for CloudFlare configuration.
 *
 * @package    InterWorx
 * @subpackage Payload
 */
class Payload_Factory_SW_Cloudflare {
  /**
   * Domains payload.
   *
   * @param SiteWorx $SW
   * @param string   $domain
   * @return Payload
   */
  static public function subdomains( SiteWorx $SW, $domain = null ) {
    $plugin = IW::PluginManager()->getPlugin( 'cloudflare' );
    $domains = self::_getDomains( $SW, $domain );

    $Payload = new Payload( $domains );
    $Payload->setName( 'cloudflare_domains' );
    $Payload->setTitle( 'Cloudflare DNS Settings' );

    $Payload->setColumn( new Payload_Column( 'type' ) );
    $Payload->setColumn( new Payload_Column( 'subdomain' ) )
      ->setIsSortable( true )
      ->setOrderBy( 'subdomain' )
      ->setLabel( 'Subdomain' );

    $Payload->setColumn( new Payload_Column( 'record' ) );
    $Payload->setColumn( new Payload_Column( 'status' ) )
      ->addFormatter( new IWorx_Formatter_CloudflareEnabledDisabled( 'subdomain' ) )
      ->setLabel( '##LG_STATUS##' );

    return $Payload;
  }
}
Plugin Case Study: Session History
The Session History plugin allows the system administrator to log user activity across the system for any number of purposes. It provides very standard examples of both formatters and templates.
The page formatter takes a row from the payload output (line 19) and parses the controller and action name into a convenient link (line 21). [see below]
/**
 * Displays the page uri based on the ctrl and action name.
 *
 * @package    InterWorx
 * @subpackage Payload
 */
class IWorx_Formatter_History_Page extends IWorx_Formatter_Complex {
  /**
   * Format.
   *
   * @param mixed  $value The value being rendered
   * @param object $row   The data for the entire row
   * @param array  $data  The entire dataset of the Payload
   *
   * @return string
   */
  public function format( $value, $row, array $data ) {
    $ctrl = Ctrl_Util::convertClassNameToPath( $row->ctrl_name );
    $link = "{$ctrl}?action={$row->action_name}";
    return $link;
  }
}
Finally, the history template is a textbook sample of the possibilities of the template system, using the Smarty syntax. [see below]
{iw_add_js file="/plugins/images/history/search_session_history.js"}

{literal}
<style scoped>
  .iw-fake-table-hd .iw-form-img {   display: none;   }
  .td-timestamp {   white-space: nowrap;   min-width: 120px;   }
  .td-query_string {   white-space: nowrap;   }
  .td-change, .th-change {   max-width: 200px;   }
</style>
{/literal}

<div id="history-search" class="iw-fake-table-hd">
  <div class="right">
    {iw_form_input form=$search_form input_name=search}
    {iw_quickhelp id="LG_QH_SESSION_HISTORY_SEARCH"}
    {iw_form_buttons form=$search_form}
  </div>

  <div class="clear">
  </div>
</div>
{iw_payload payload=$iw_payload}